
Dig-Next-2
Wiring Guide
Wiring up your LED controller can quickly become confusing when your setup grows. The Dig-Next-2 is specifically to make small to medium setups quick and easy to deploy! This article will go over common 5V, 12V and 24V LED strips scenarios and provide examples how to wire them up!
Next to this guide I highly recommend watching the ultimate power injection video which will explain a lot of the principles behind it, why they are like this and how to design for your specific setup yourself!
5V single strip
5 meters/16ft of 60LEDs/m strip has 300 LEDs in total, according to my real-world powersheet these can use up to 13A so that would mean lots of thick cables! But it really depends on your expected usage how many injections you need to make, 5V can be unforgiving if you really want to run it at maximum power though but the Dig-Next-2 is up to the task!Below are examples for 5V with just 5m/16ft to show what a minimal, a properly a fully injection setup looks like:
 Minimally injected – Single injection allows for 5V 4A – 20W
 Properly injected – Double injection allows for 5V 8A – 40W
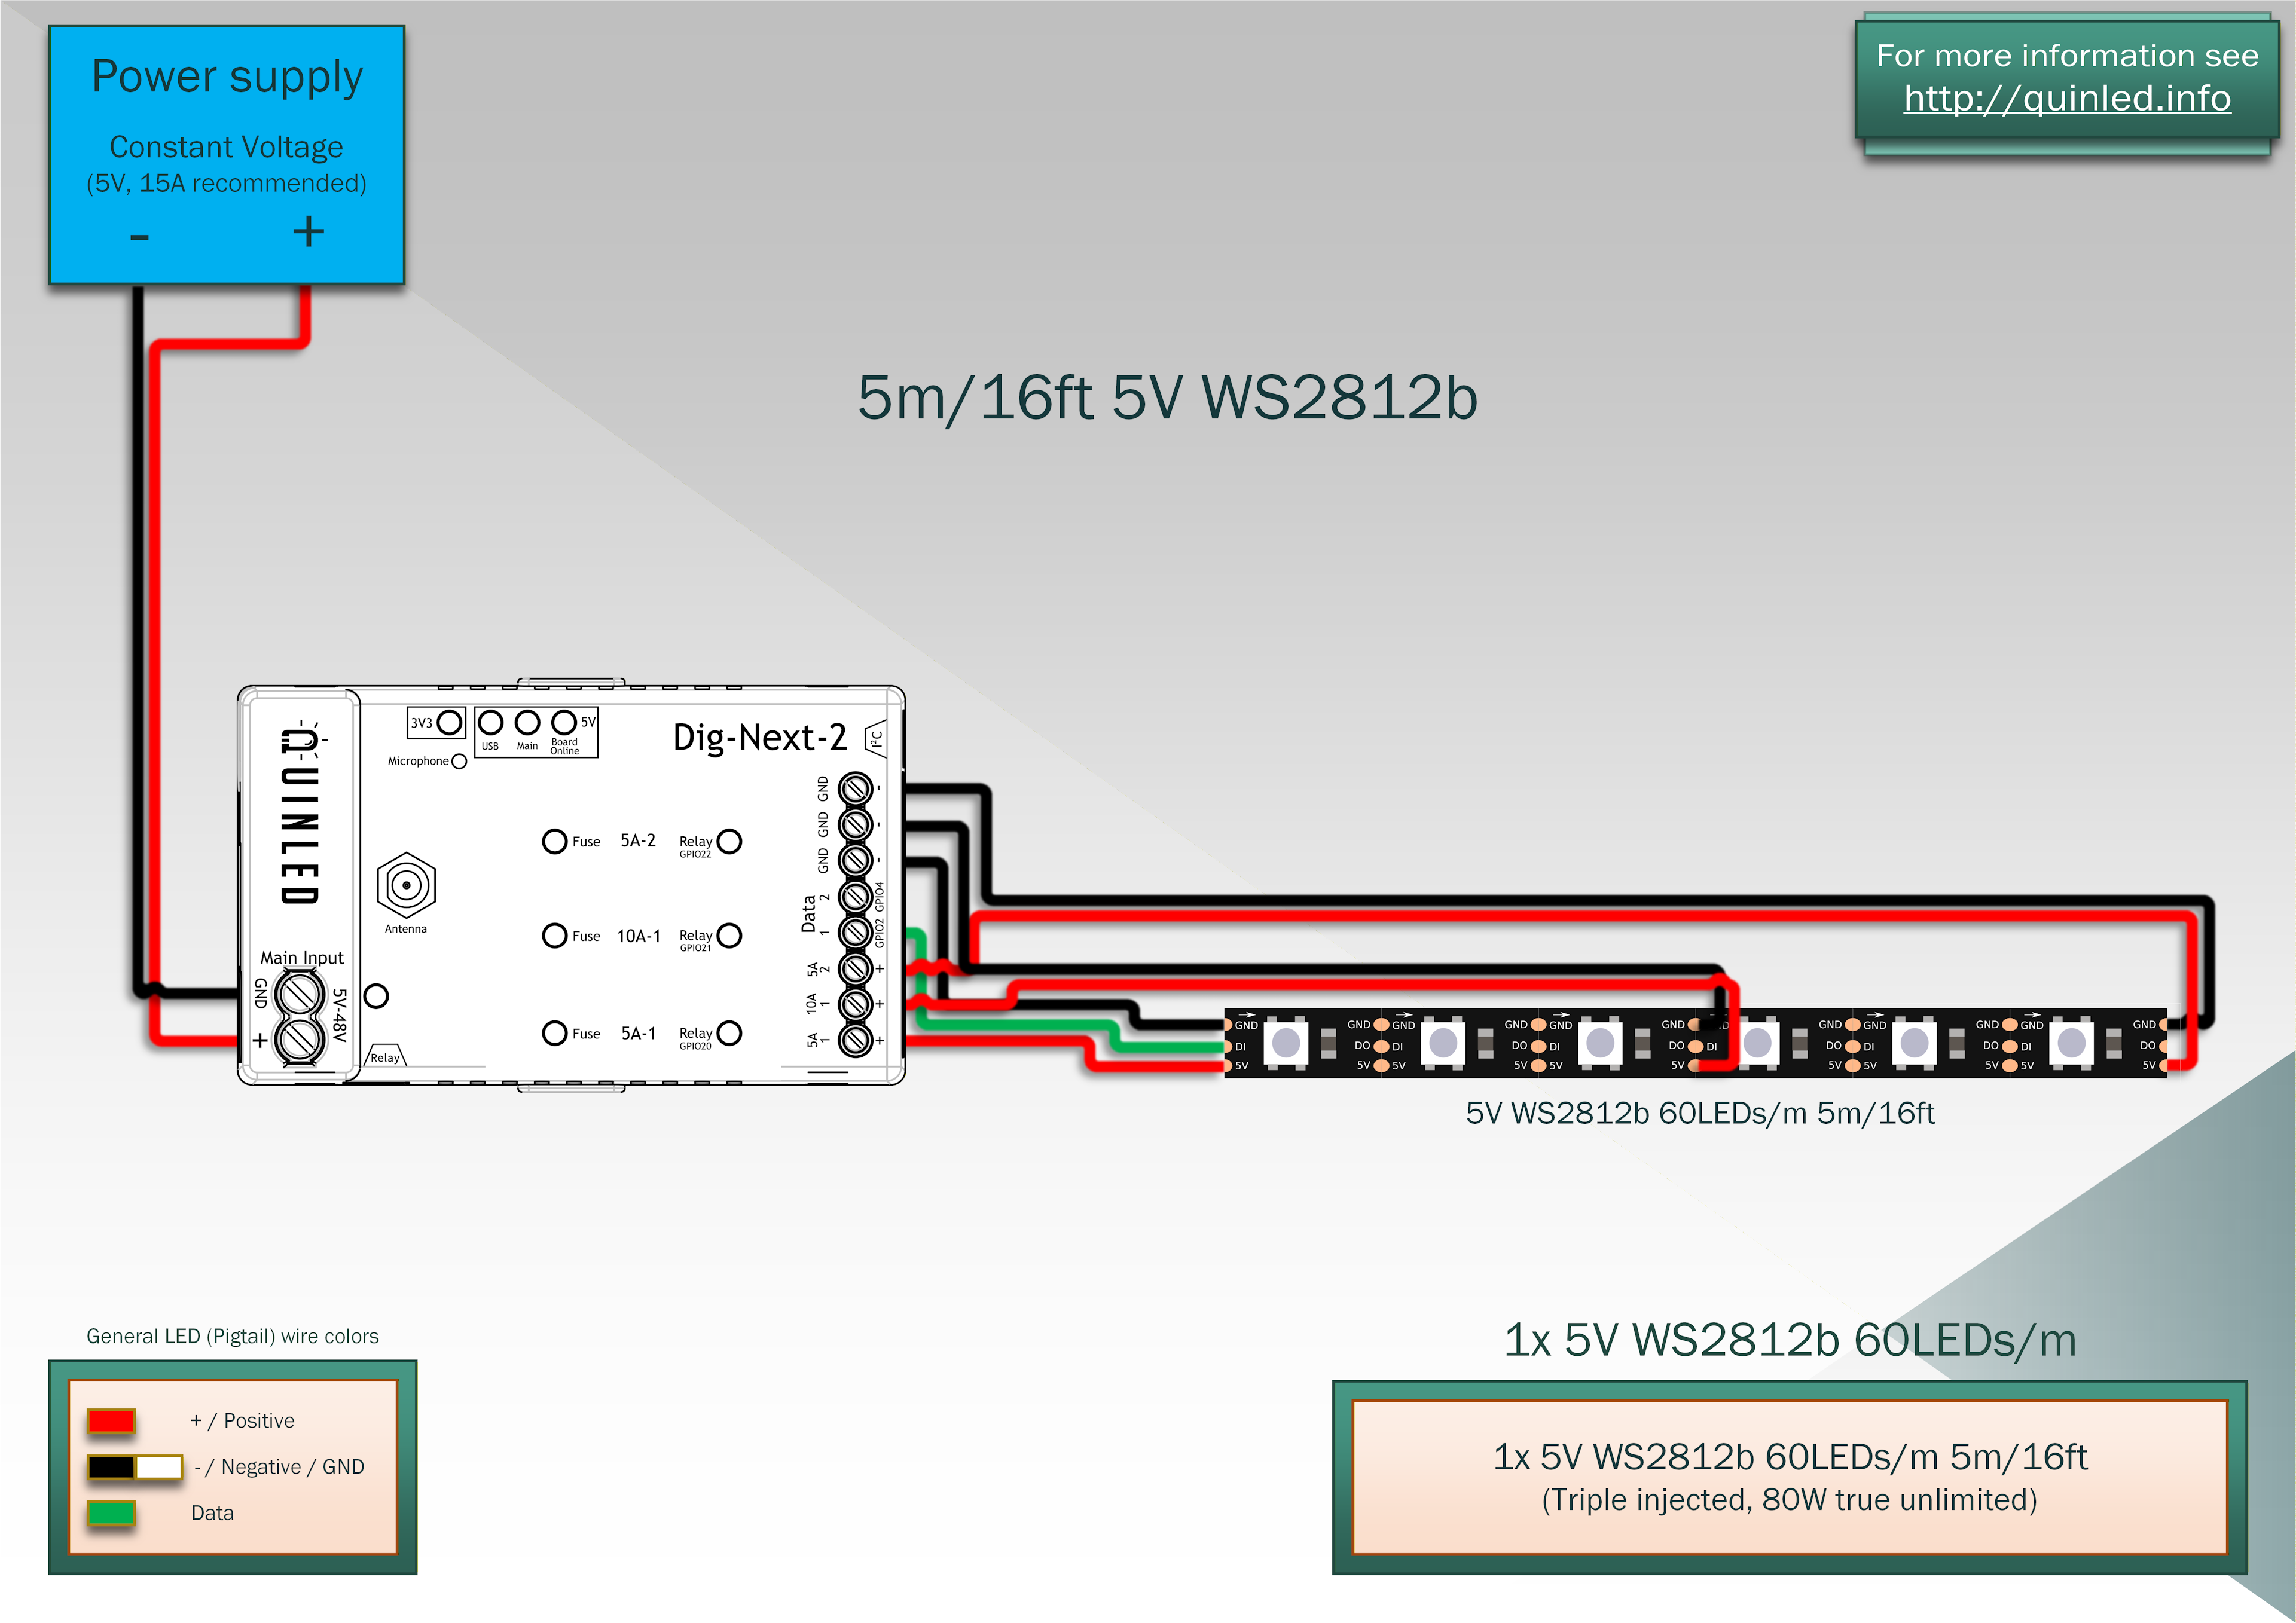 Fully injected – Triple injection allows for 5V 16A – 80W but still will only use up to 13A max.
As you can see, to reach the full potential of 13A it needs a lot of cabling and power injections, even if it’s just for a 5m/16ft strip! Generally speaking though you can run 5V strip fine with dual injection per 5m/16ft and if you really don’t need a lot of brightness, a single injection will do but be mindful that with a single injection you can’t even run rainbow at 100% without experiencing too much voltage drop and getting some dimming on the strip.
5V 10m/32ft (2 strips) example
Here is a last 5V example with 10m/32ft of strip total, because of the amount of Amps involved, this already requires triple injections to do it properly and the Dig-Next-2 is up to the task but anything longer then that you’ll want a bigger controller with more power outputs (and throughput) such as a Dig-Octa for instance.
 Properly injected – Triple injection allows for 5V 16A – 80W
If you’d like to see examples with longer 5V strip, please take a look at the ultimate power injection guide which discusses examples up to 20M! This guide also teaches you how to calculate wire diameters per injection wire!
12V LED strip example
For the 12V strips I’ve chosen an example with the popular single addressable WS2815. Wiring for WS2811 or WS2814 can be slightly different, depending on power usage but generally they are very similar. With the 12V WS2815 things already become a lot easier and we can go up to 20m/64ft without any problem on the Dig-Next-2 with it providing dual data outputs, plenty of performance and 3x fused power outputs, making it a perfect fit!
For strips with primary and backup data inputs we recommend connecting backup data to GND, either with a 4th wire or using a little solder blob as shown in the below examples
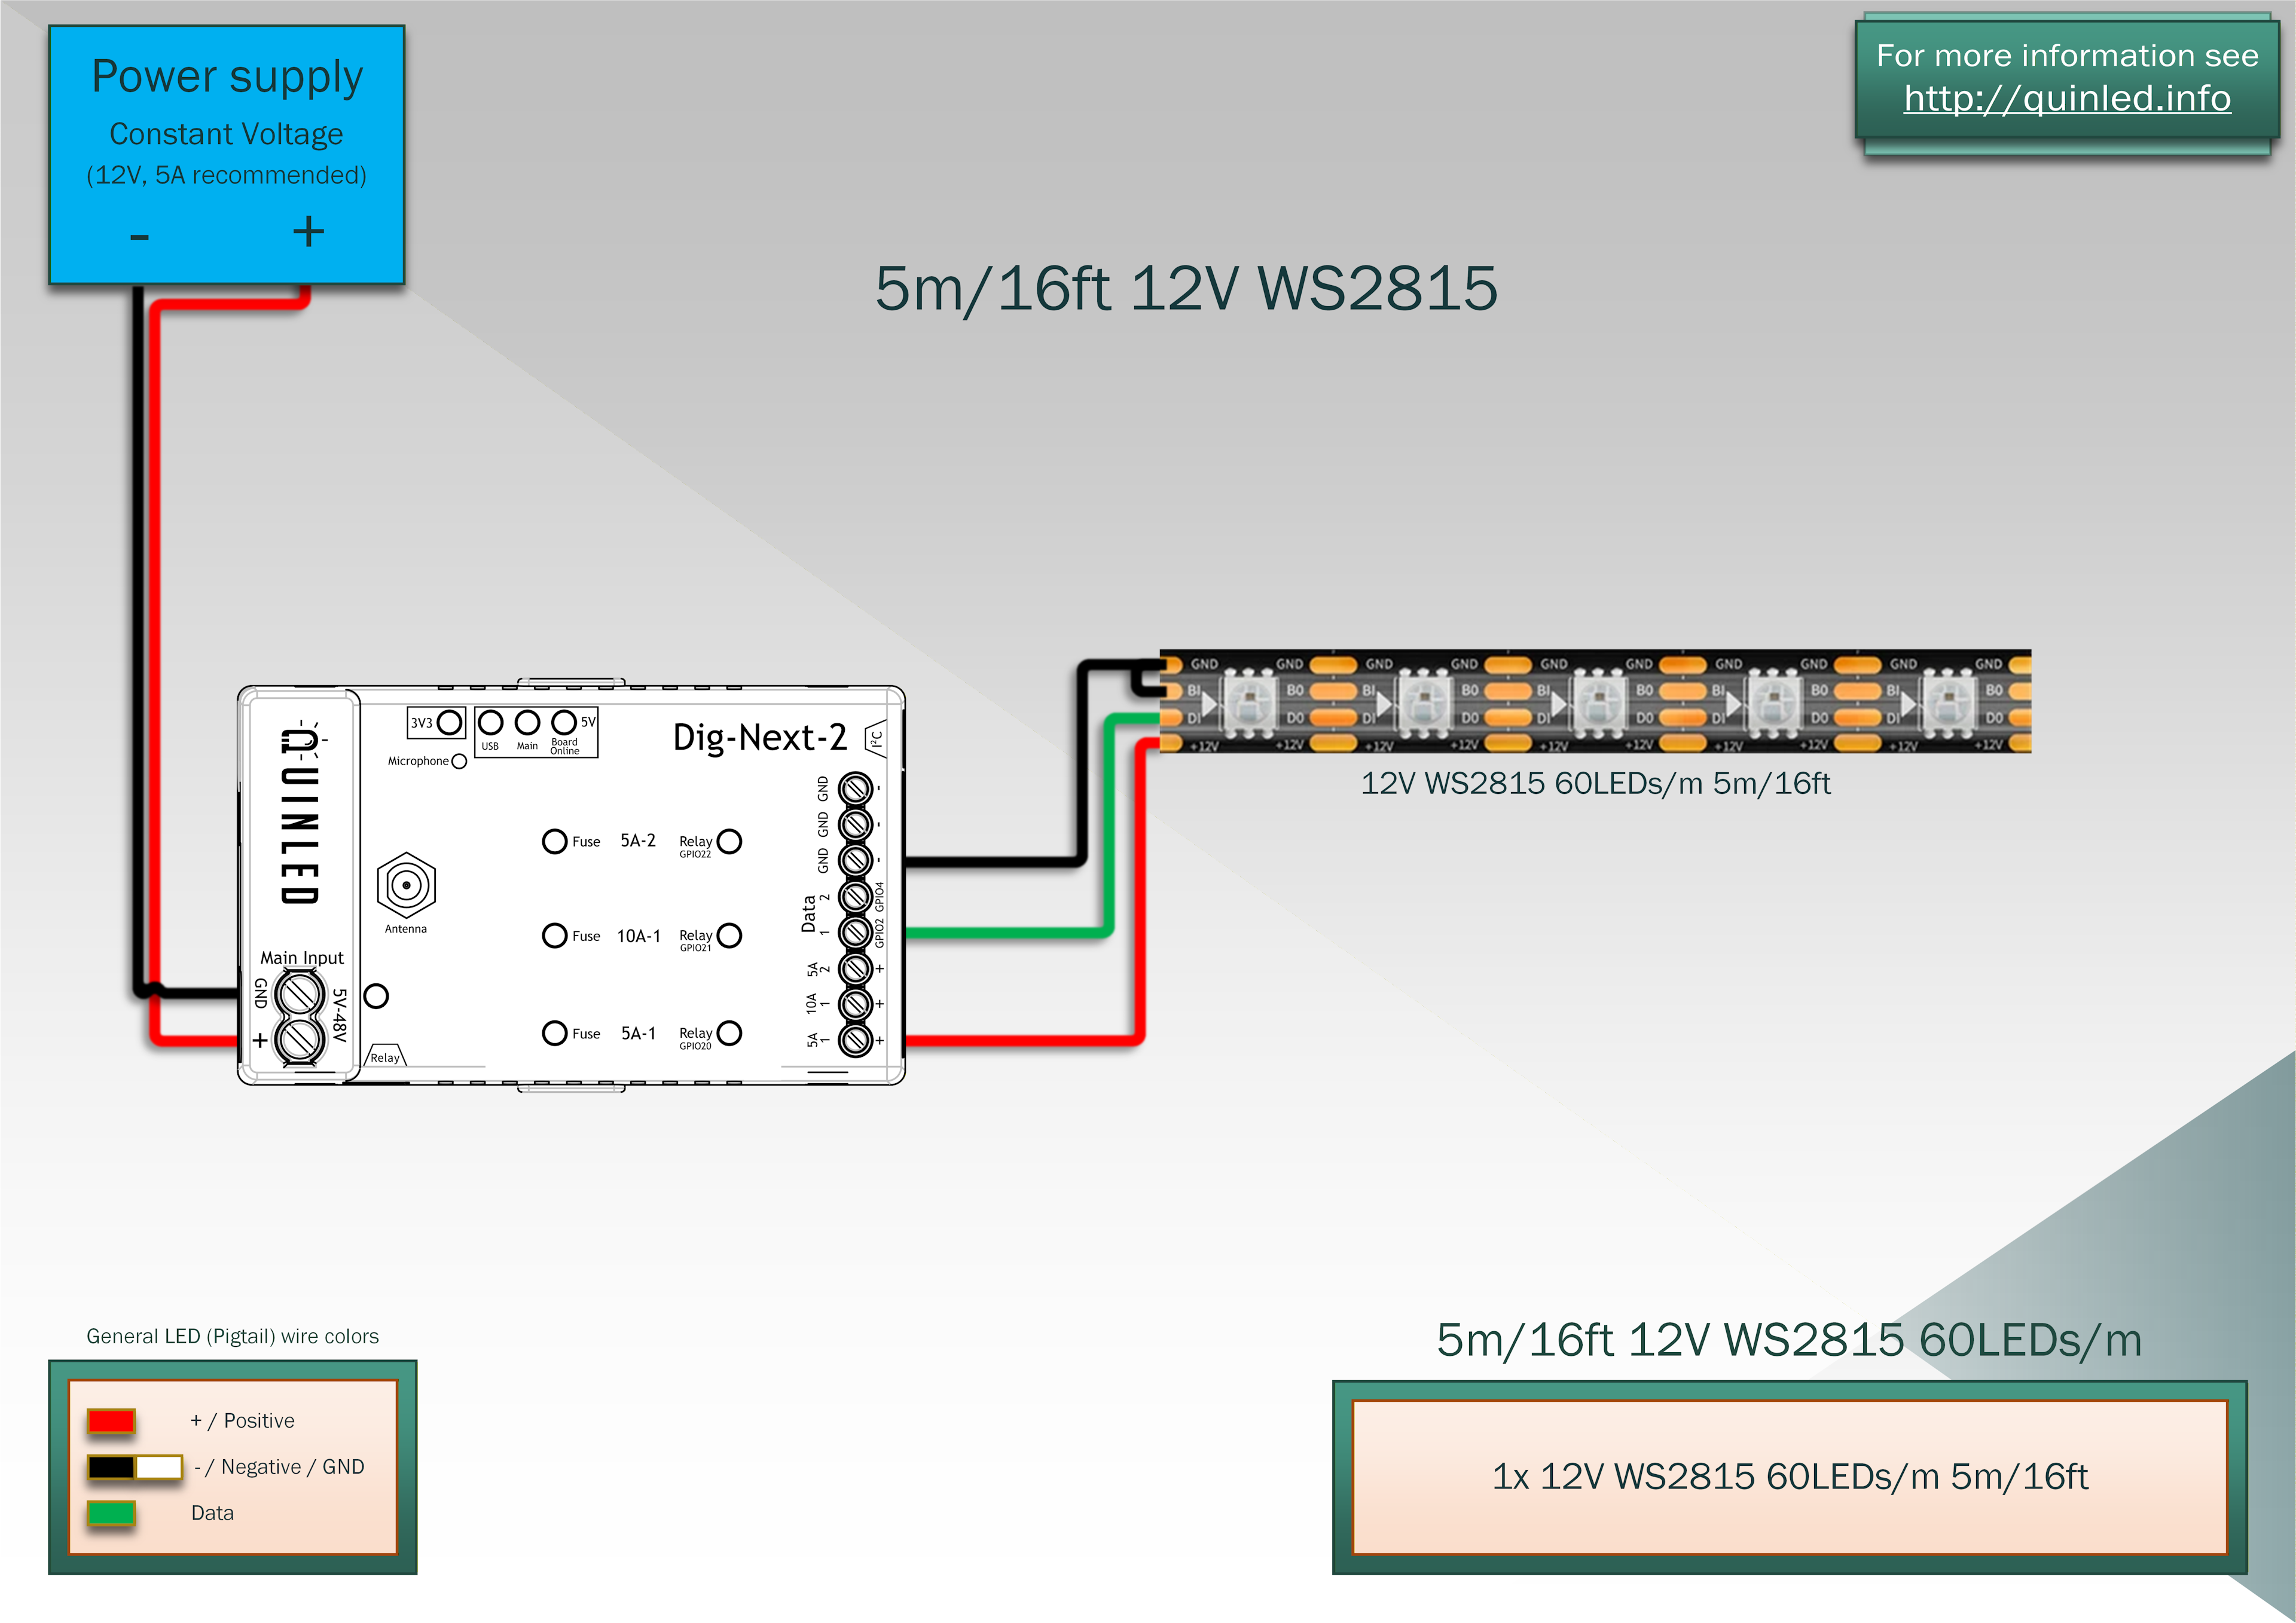 5m/16 with a single injection 12V 4A – 48W, perfect for expected 50W max usage!
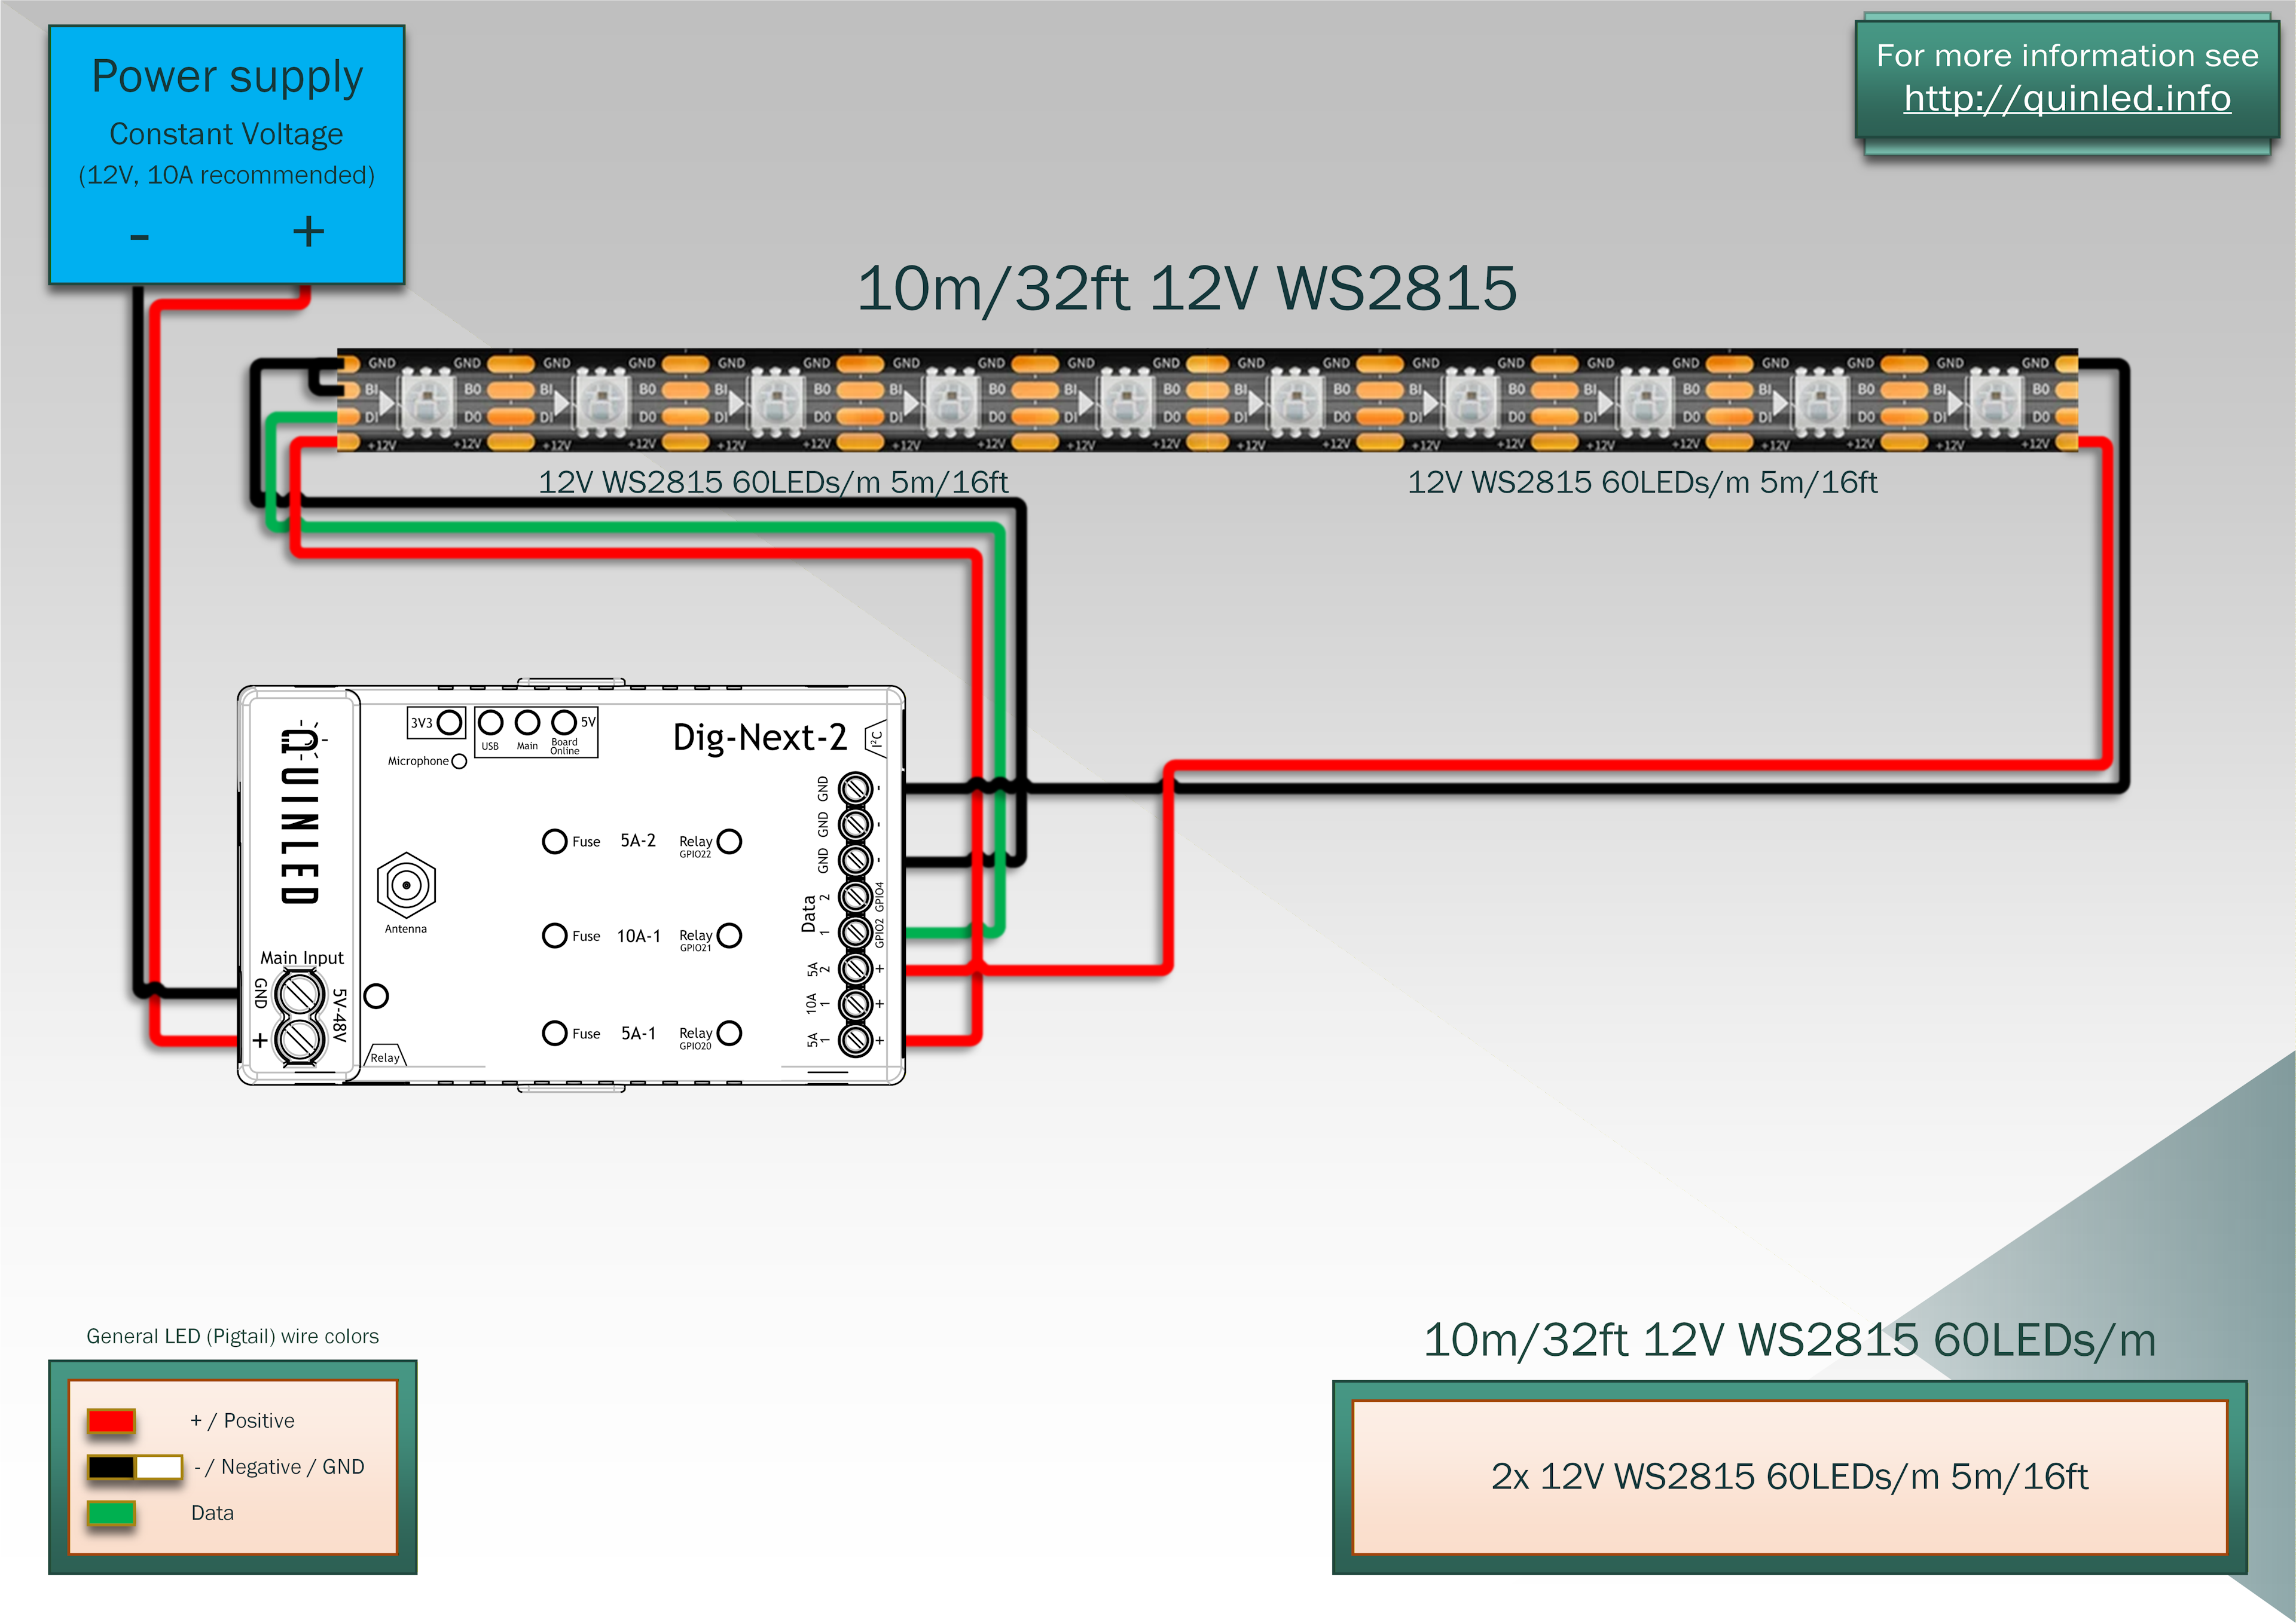 10m/32ft with dual injections, 8A – 96W, perfect for expected 100W max usage!
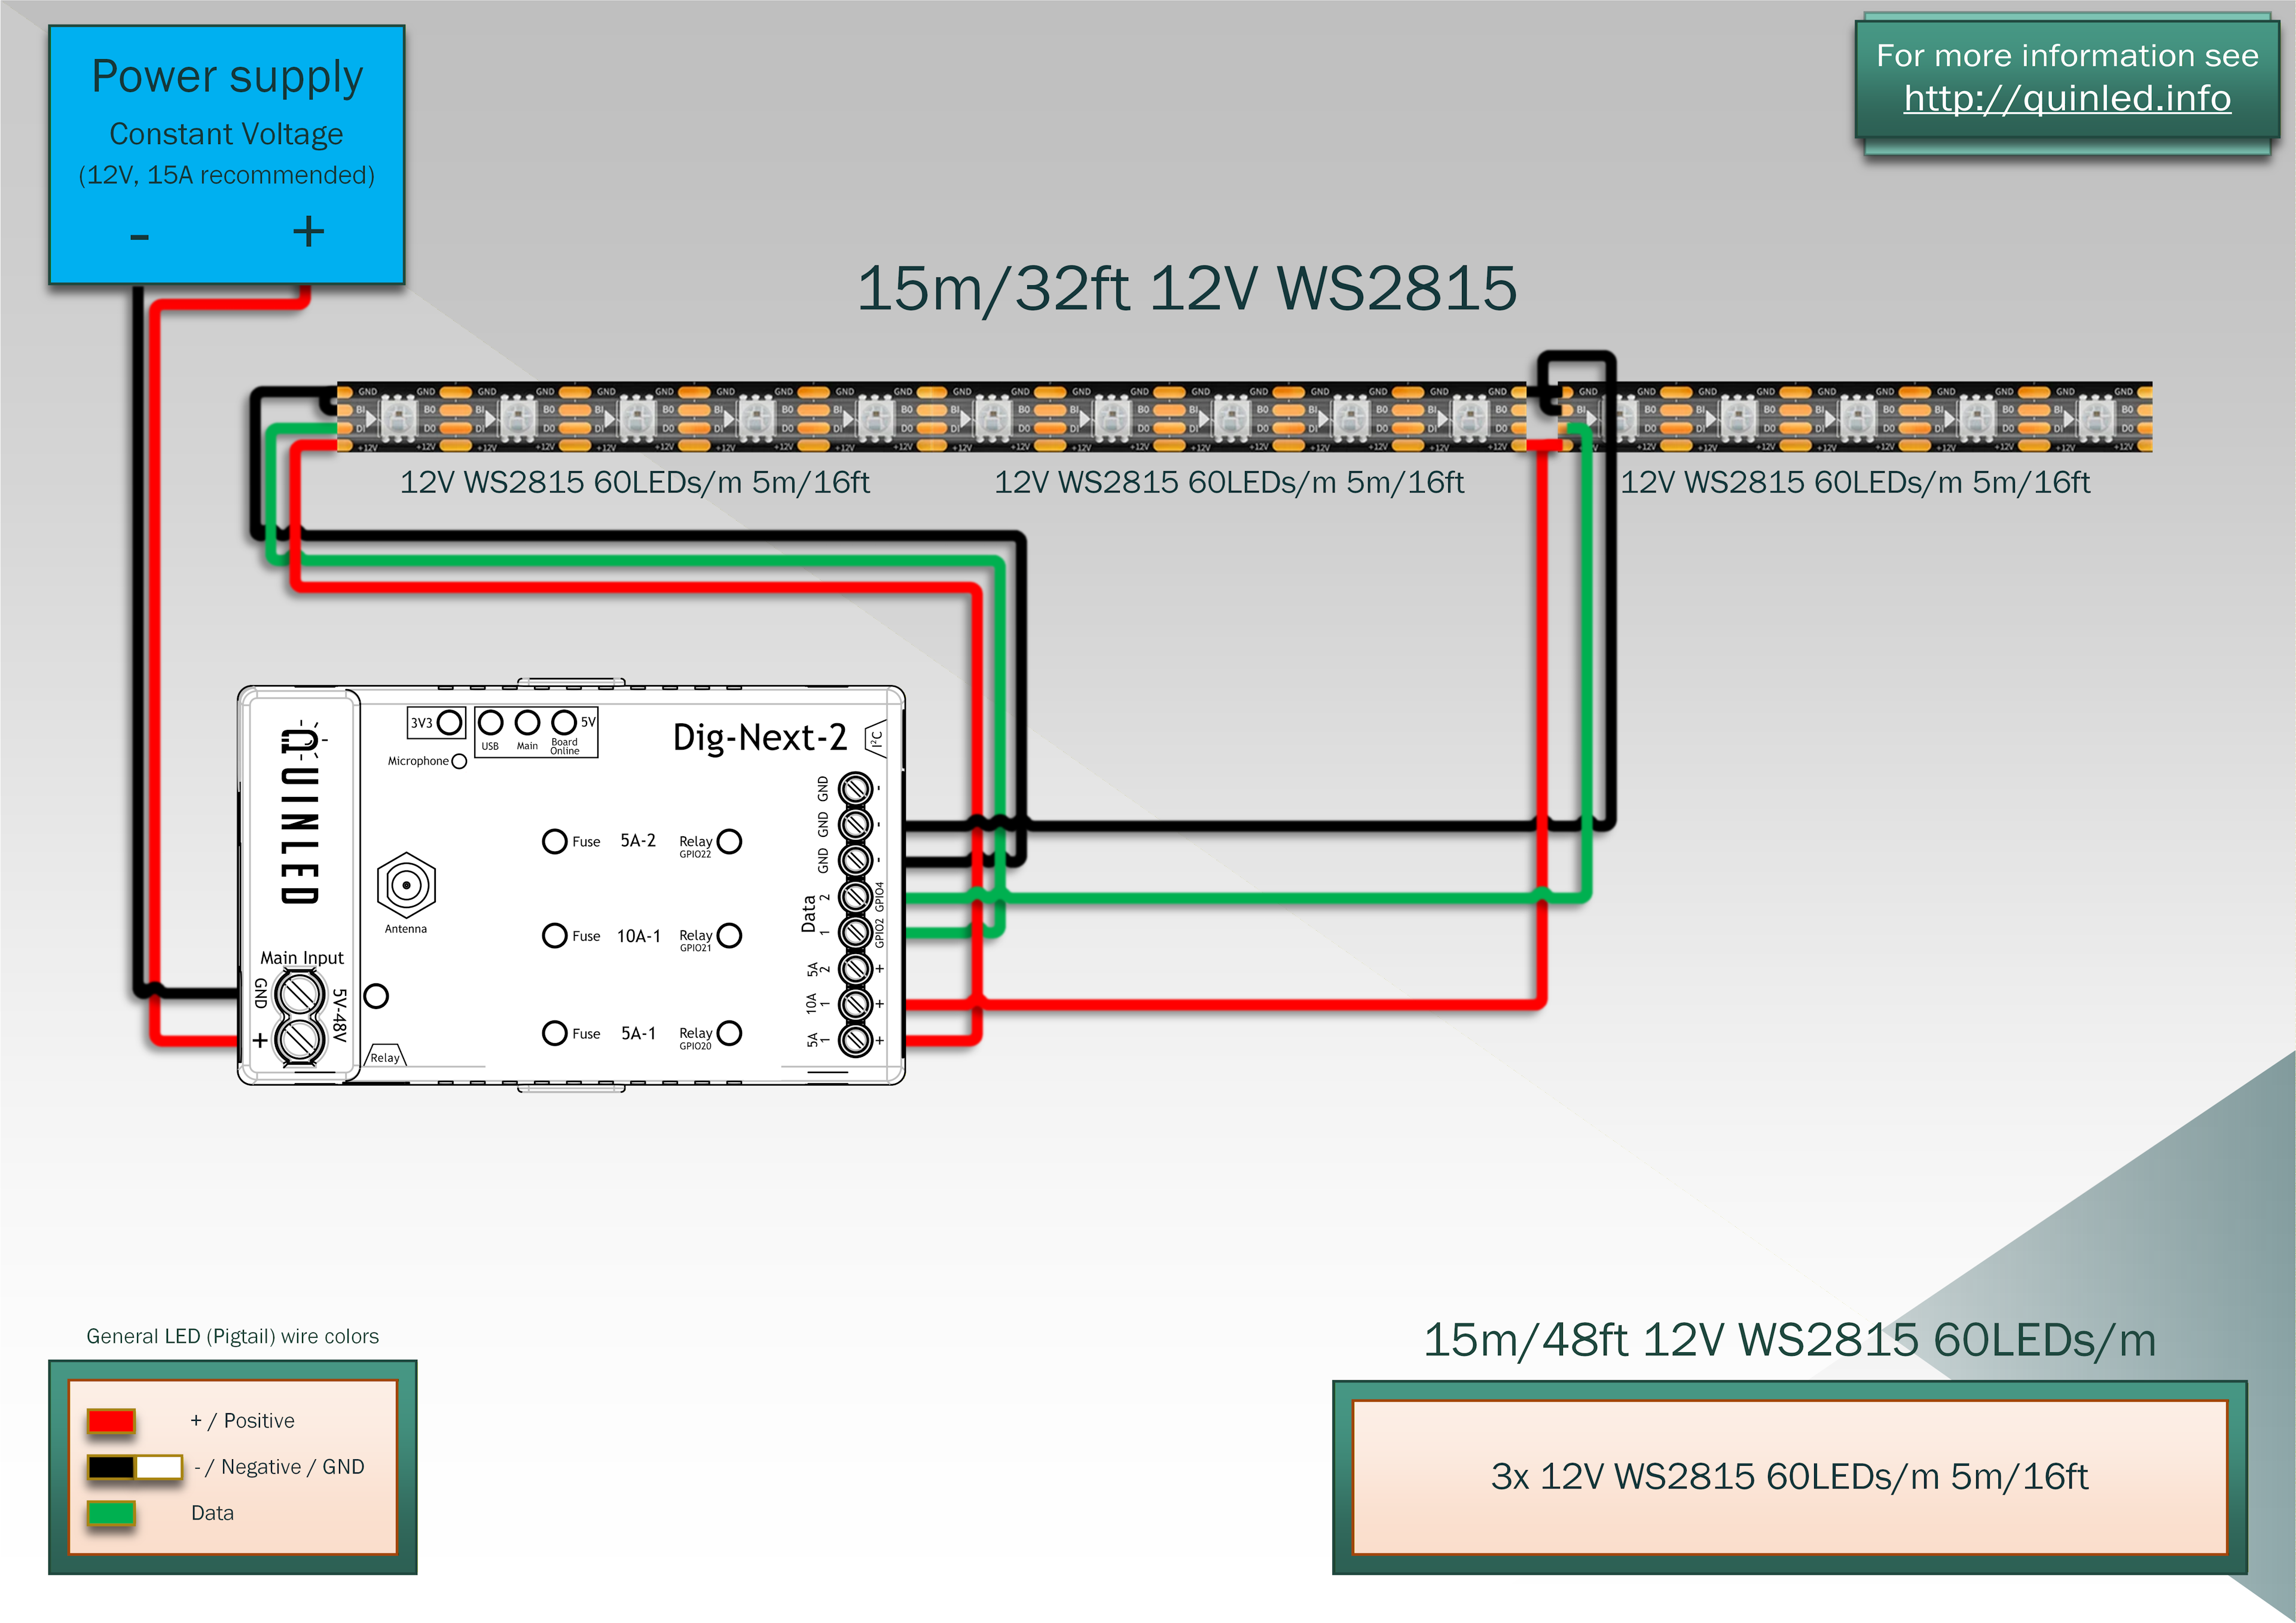 With 15m/48ft we can still use 2 power injections but we change it to a front + middle. Since we move beyond 600 LEDs we also need an extra data channel. This will have up to 12V 12A – 144W capability, again perfect for the expected max usage of 150W!
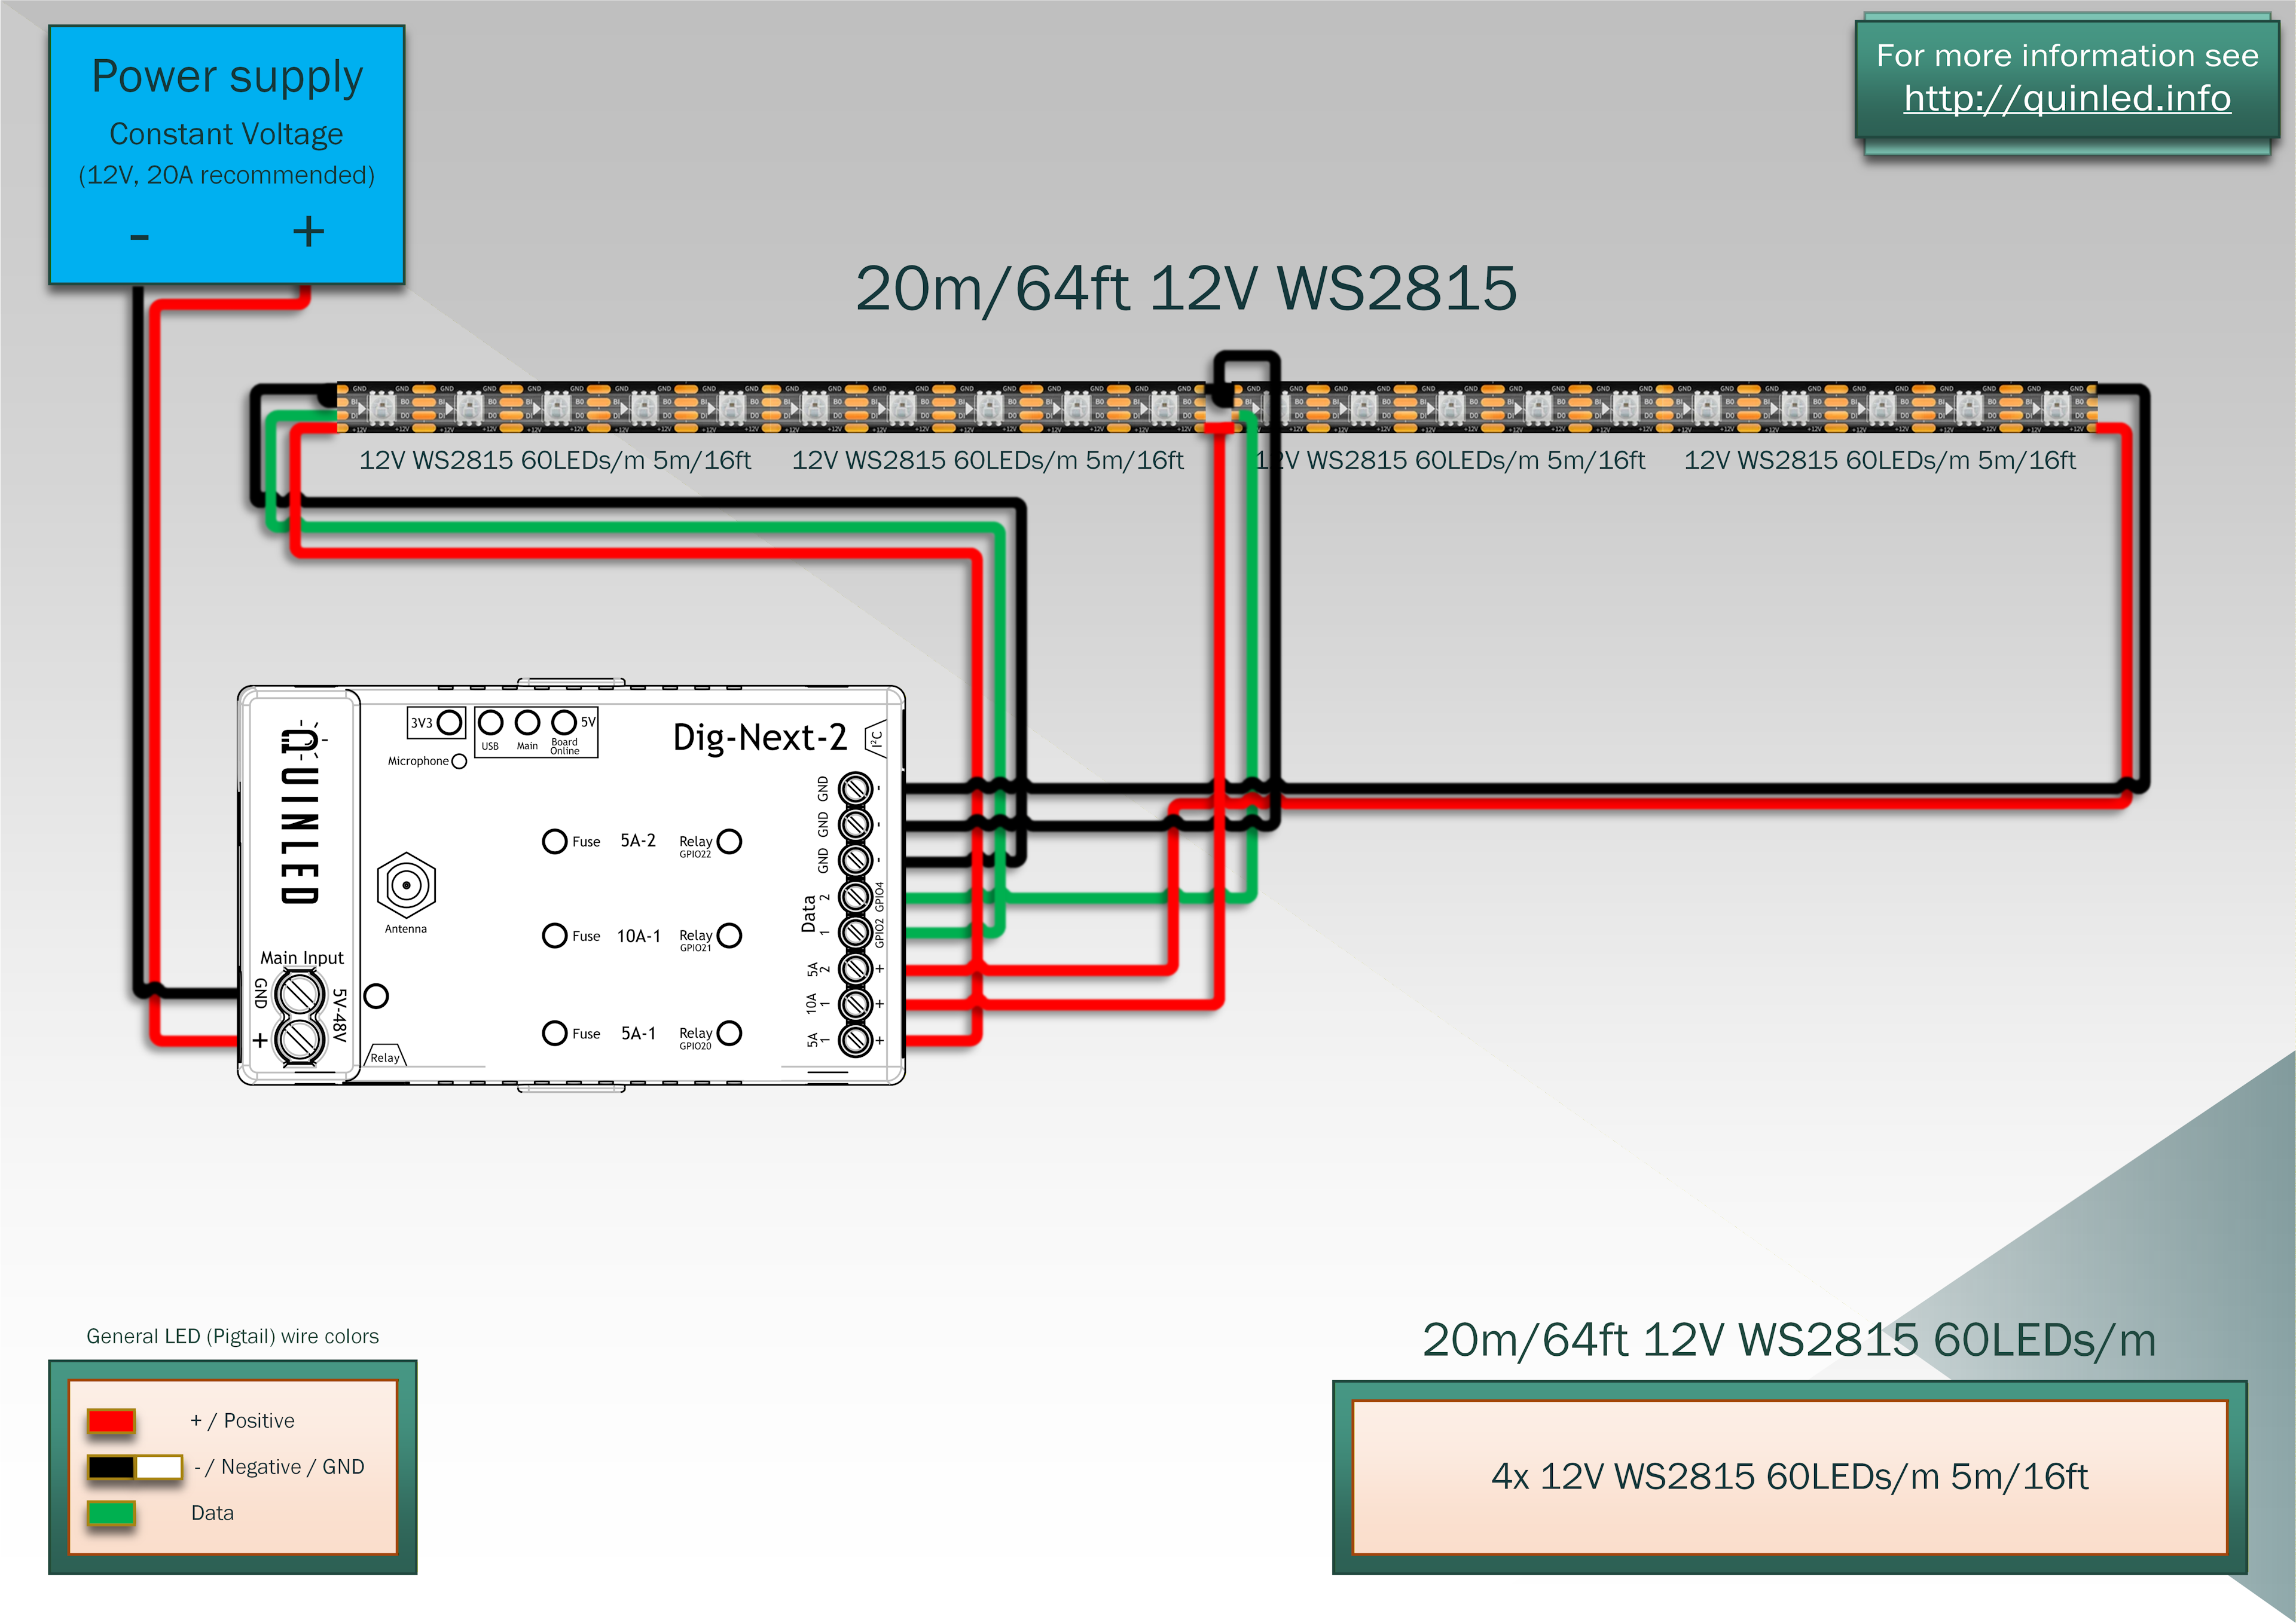 When running 20m/64ft of 12V WS2815 you are using the full capabilities of the Dig-Next-2, we need 2x data channels for the 2x 600 LEDs so 1200 in total and triple injections with front + middle + end giving us 4A + 8A + 4A = 16A total @ 12V = 192W for the expected max usage of 200W!
With that last example you can see why I say that the Dig-Next-2 is suitable up to medium large installs, it perfectly scales up to 20m/64ft with perfect power injection using WS2815!
12V Bullet pixels
Another option that is often used with the QuinLED controllers are Christmas style bullet pixels. Although power injection rules are generally the same, here are a few examples for you to work with!
The wiring is still depicted as Red/Black for VCC/GND and Green for data but usually in these scenarios it’s something like xConnect cabling and connectors!
![]() For 100 pixels it’s pretty easy, just wire it up and done!
For 100 pixels it’s pretty easy, just wire it up and done!
![]() With 300pcs it’s recommended to power inject!
With 300pcs it’s recommended to power inject!
The reason behind this is that at 50% RGB white 100pcs of pixel use 35W, 35W/12V = 2,9Amps. Now if we have 300 pixels this multiplies to 8.75Amps. If you never run your pixels above say 35% to 40% you might still be fine with a single injection but if you want to be able to run single colors up to 100% and not have dimming during some patterns that use dual colors and has all pixels shining at the same time, the end power injection is recommended!
24V LED strip example
Moving to 24V things again become a bit easier on the wiring side, we can both do longer stretches without injection and since 24V strip (generally) isn’t single addressable this means we won’t need a new data channel as often either.
 5m/16ft is easy!
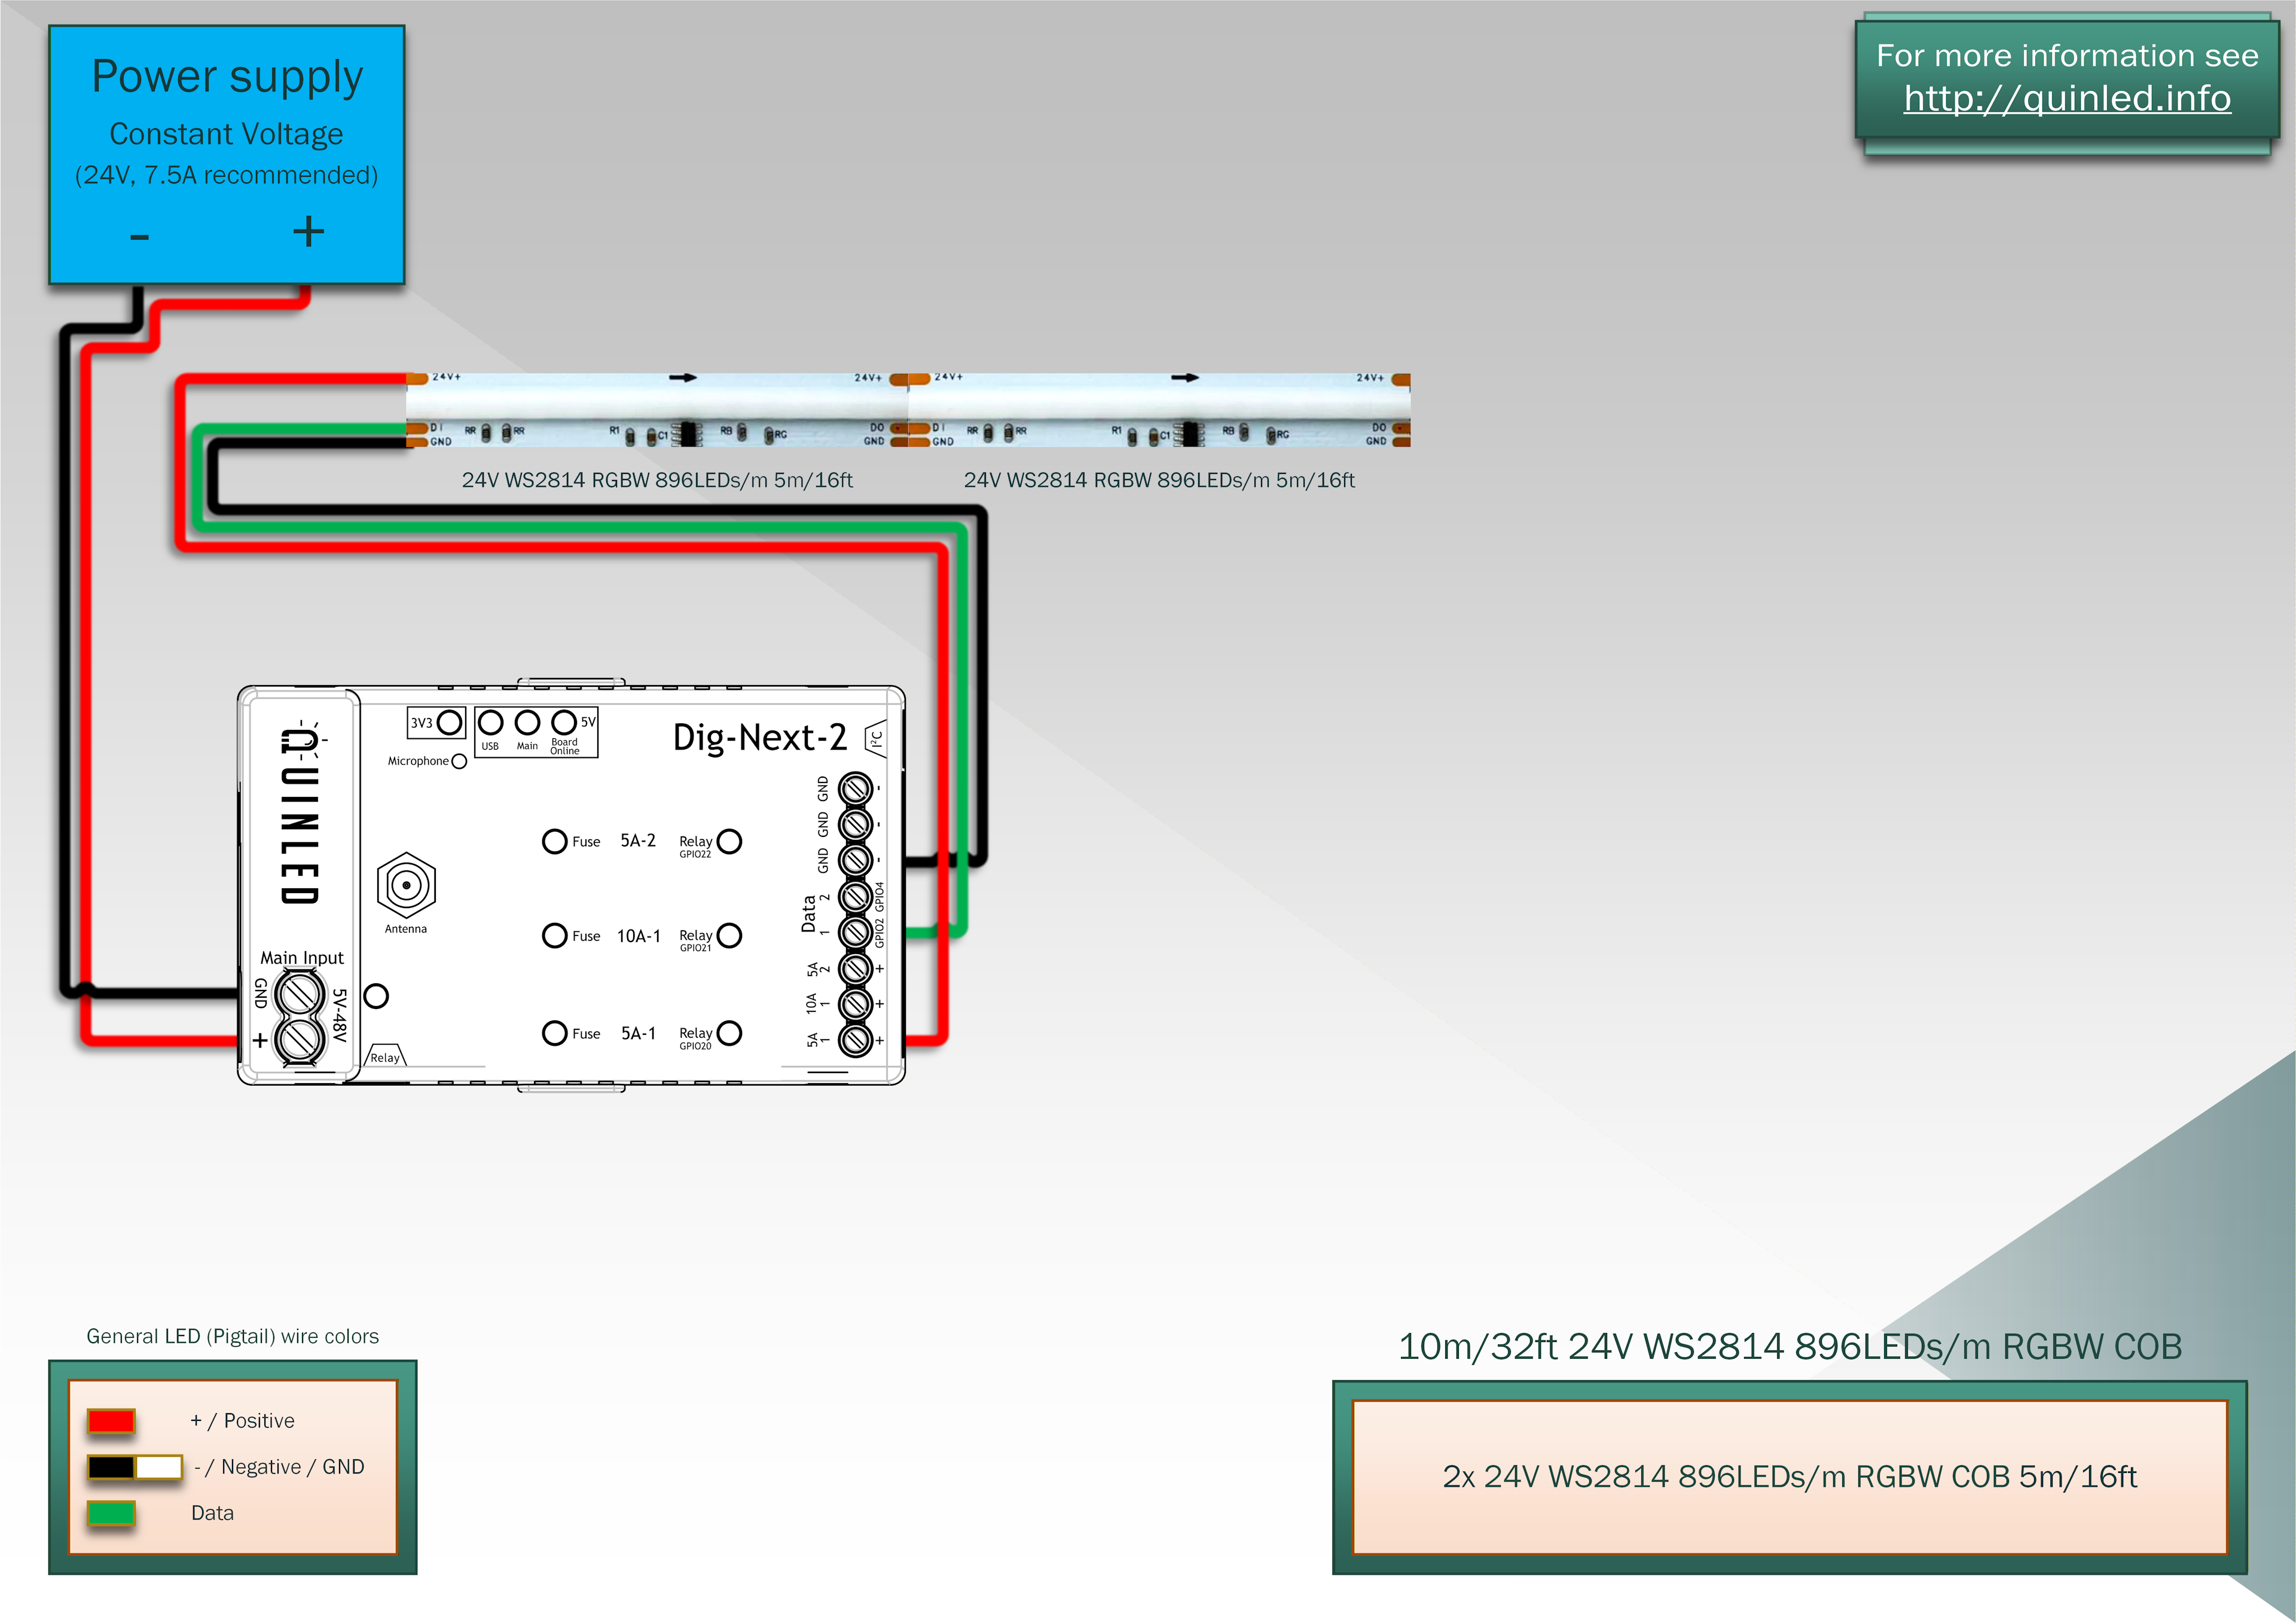 10m/32ft is basically the same as 5m, easy!
 15m/48ft means we need a second injection at the end to deliver enough current!
 20m/64ft this is still enough although on the edge!
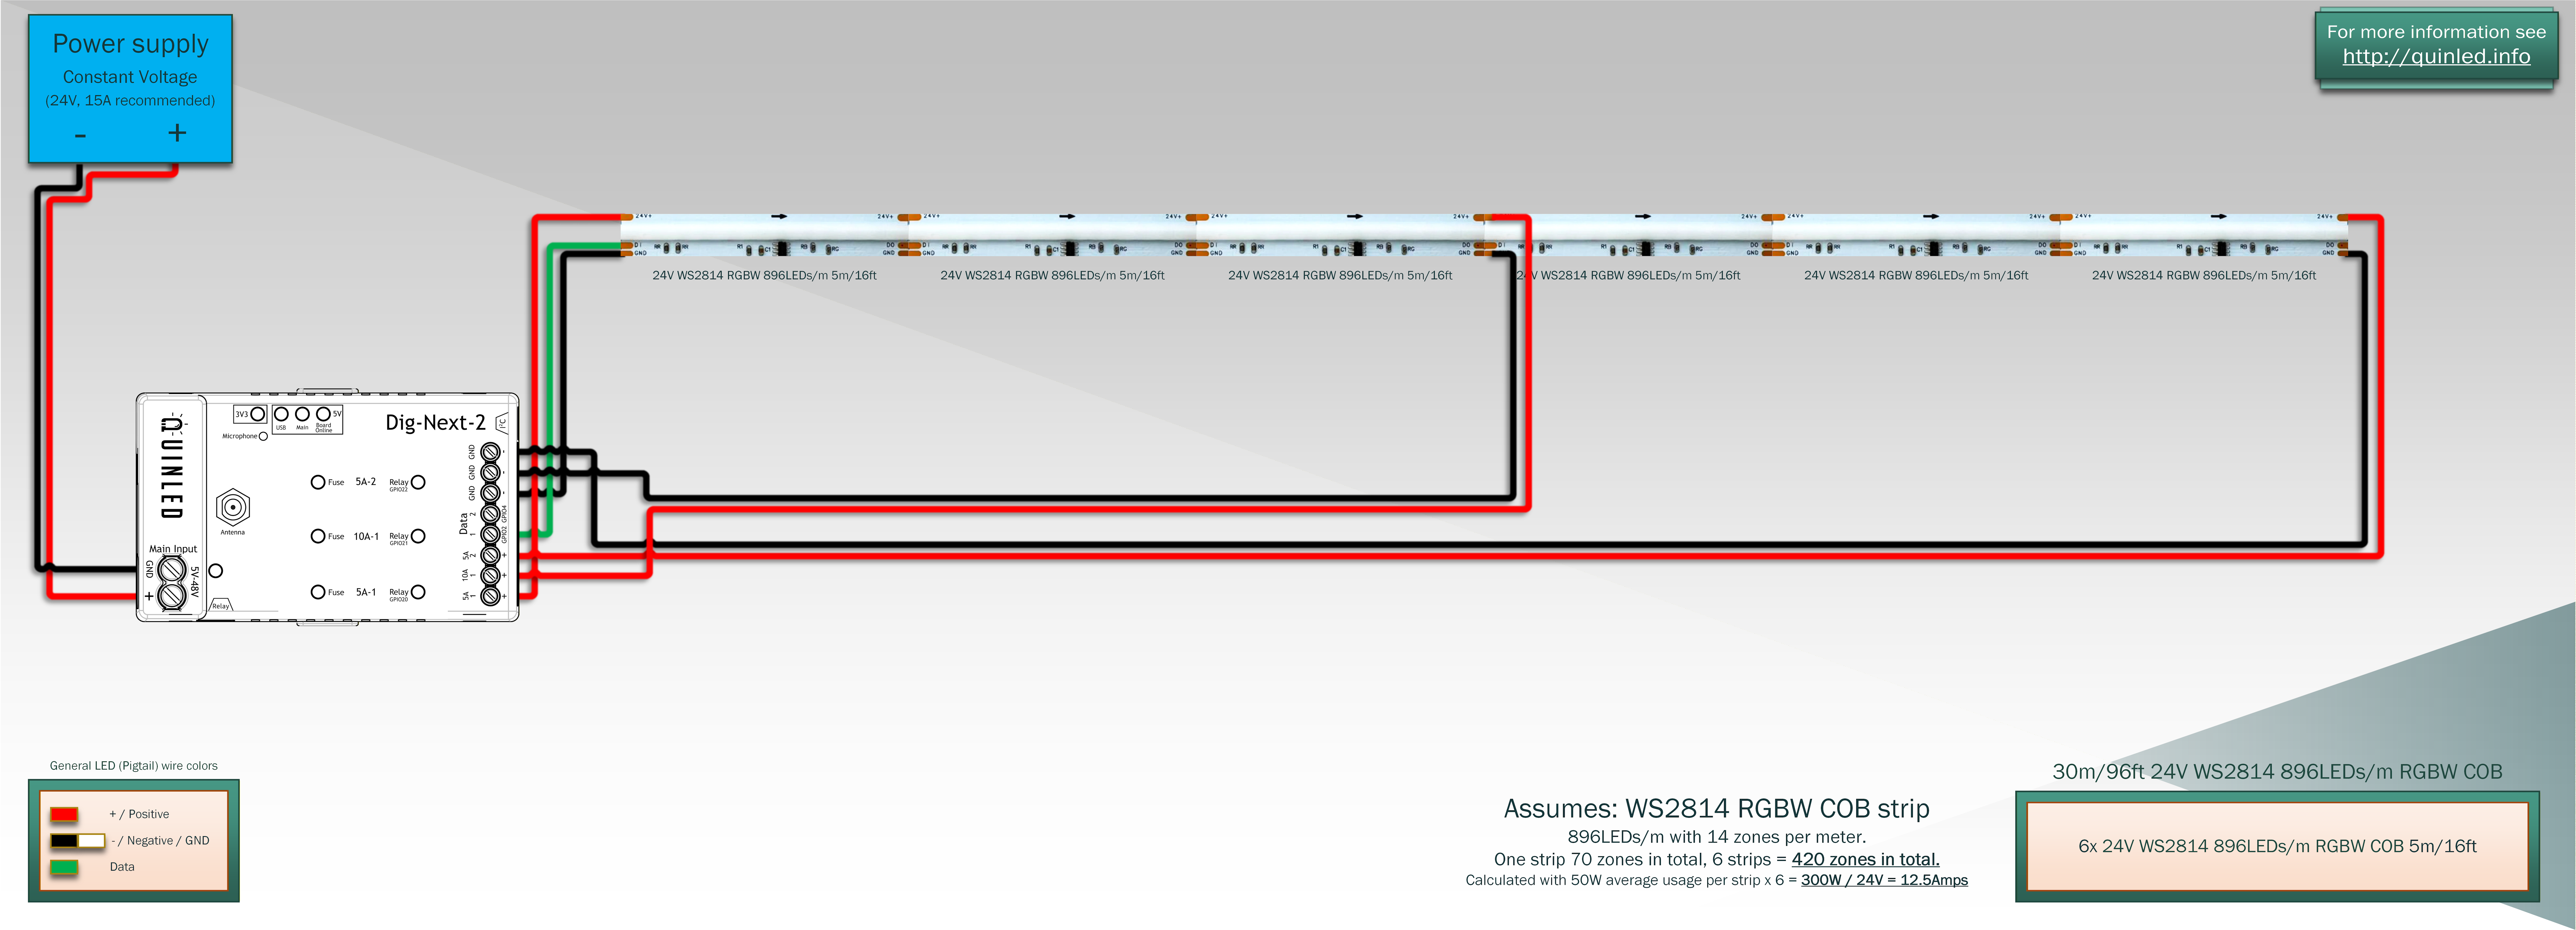 30m/96ft we require a triple injection to deliver power to all parts equally
And with 30m/96ft we’ve reached the maximum I’d recommend running on a Dig-Next-2 controller! Beyond this length you also want to add extra data connections making things more complicated. Still, with this you are running about 300W expected during higher load scenarios, that’s quite a bit of light!
High Load 12V/24V LED strip example
There are a few LED strips out there that don’t follow common conventions such as the 12V SK6812-CC that was released in 2024 or my own QuinLED Dig-COB-160! These both can use a lot more power and can draw more from a single injection point. In some cases this even means upgrading the fuses inside of the Dig-Next-2 (please see power handling guide for this).
QuinLED Dig-COB-160
As previously mentioned the QuinLED Dig-COB-160 can draw a high current, both in total and from a single injection where it can possible exceed the 5A per edge injection rule (the strip has thicker copper tracks then commonly found in normal strips). Because of this it’s ok to upgrade the fuse of 5A_1 and/or 5A_2 to 6.3A or 7.5A, higher is not recommended. That said, this is only needed for extreme situations and with normal usage (100%, white with a bit of color for instance) it will run just fine on the standard 5A fuses so personally I would just keep the 5A fuses in the Dig-Next-2 and only if you blow then with your usage pattern, replace them with a higher value.
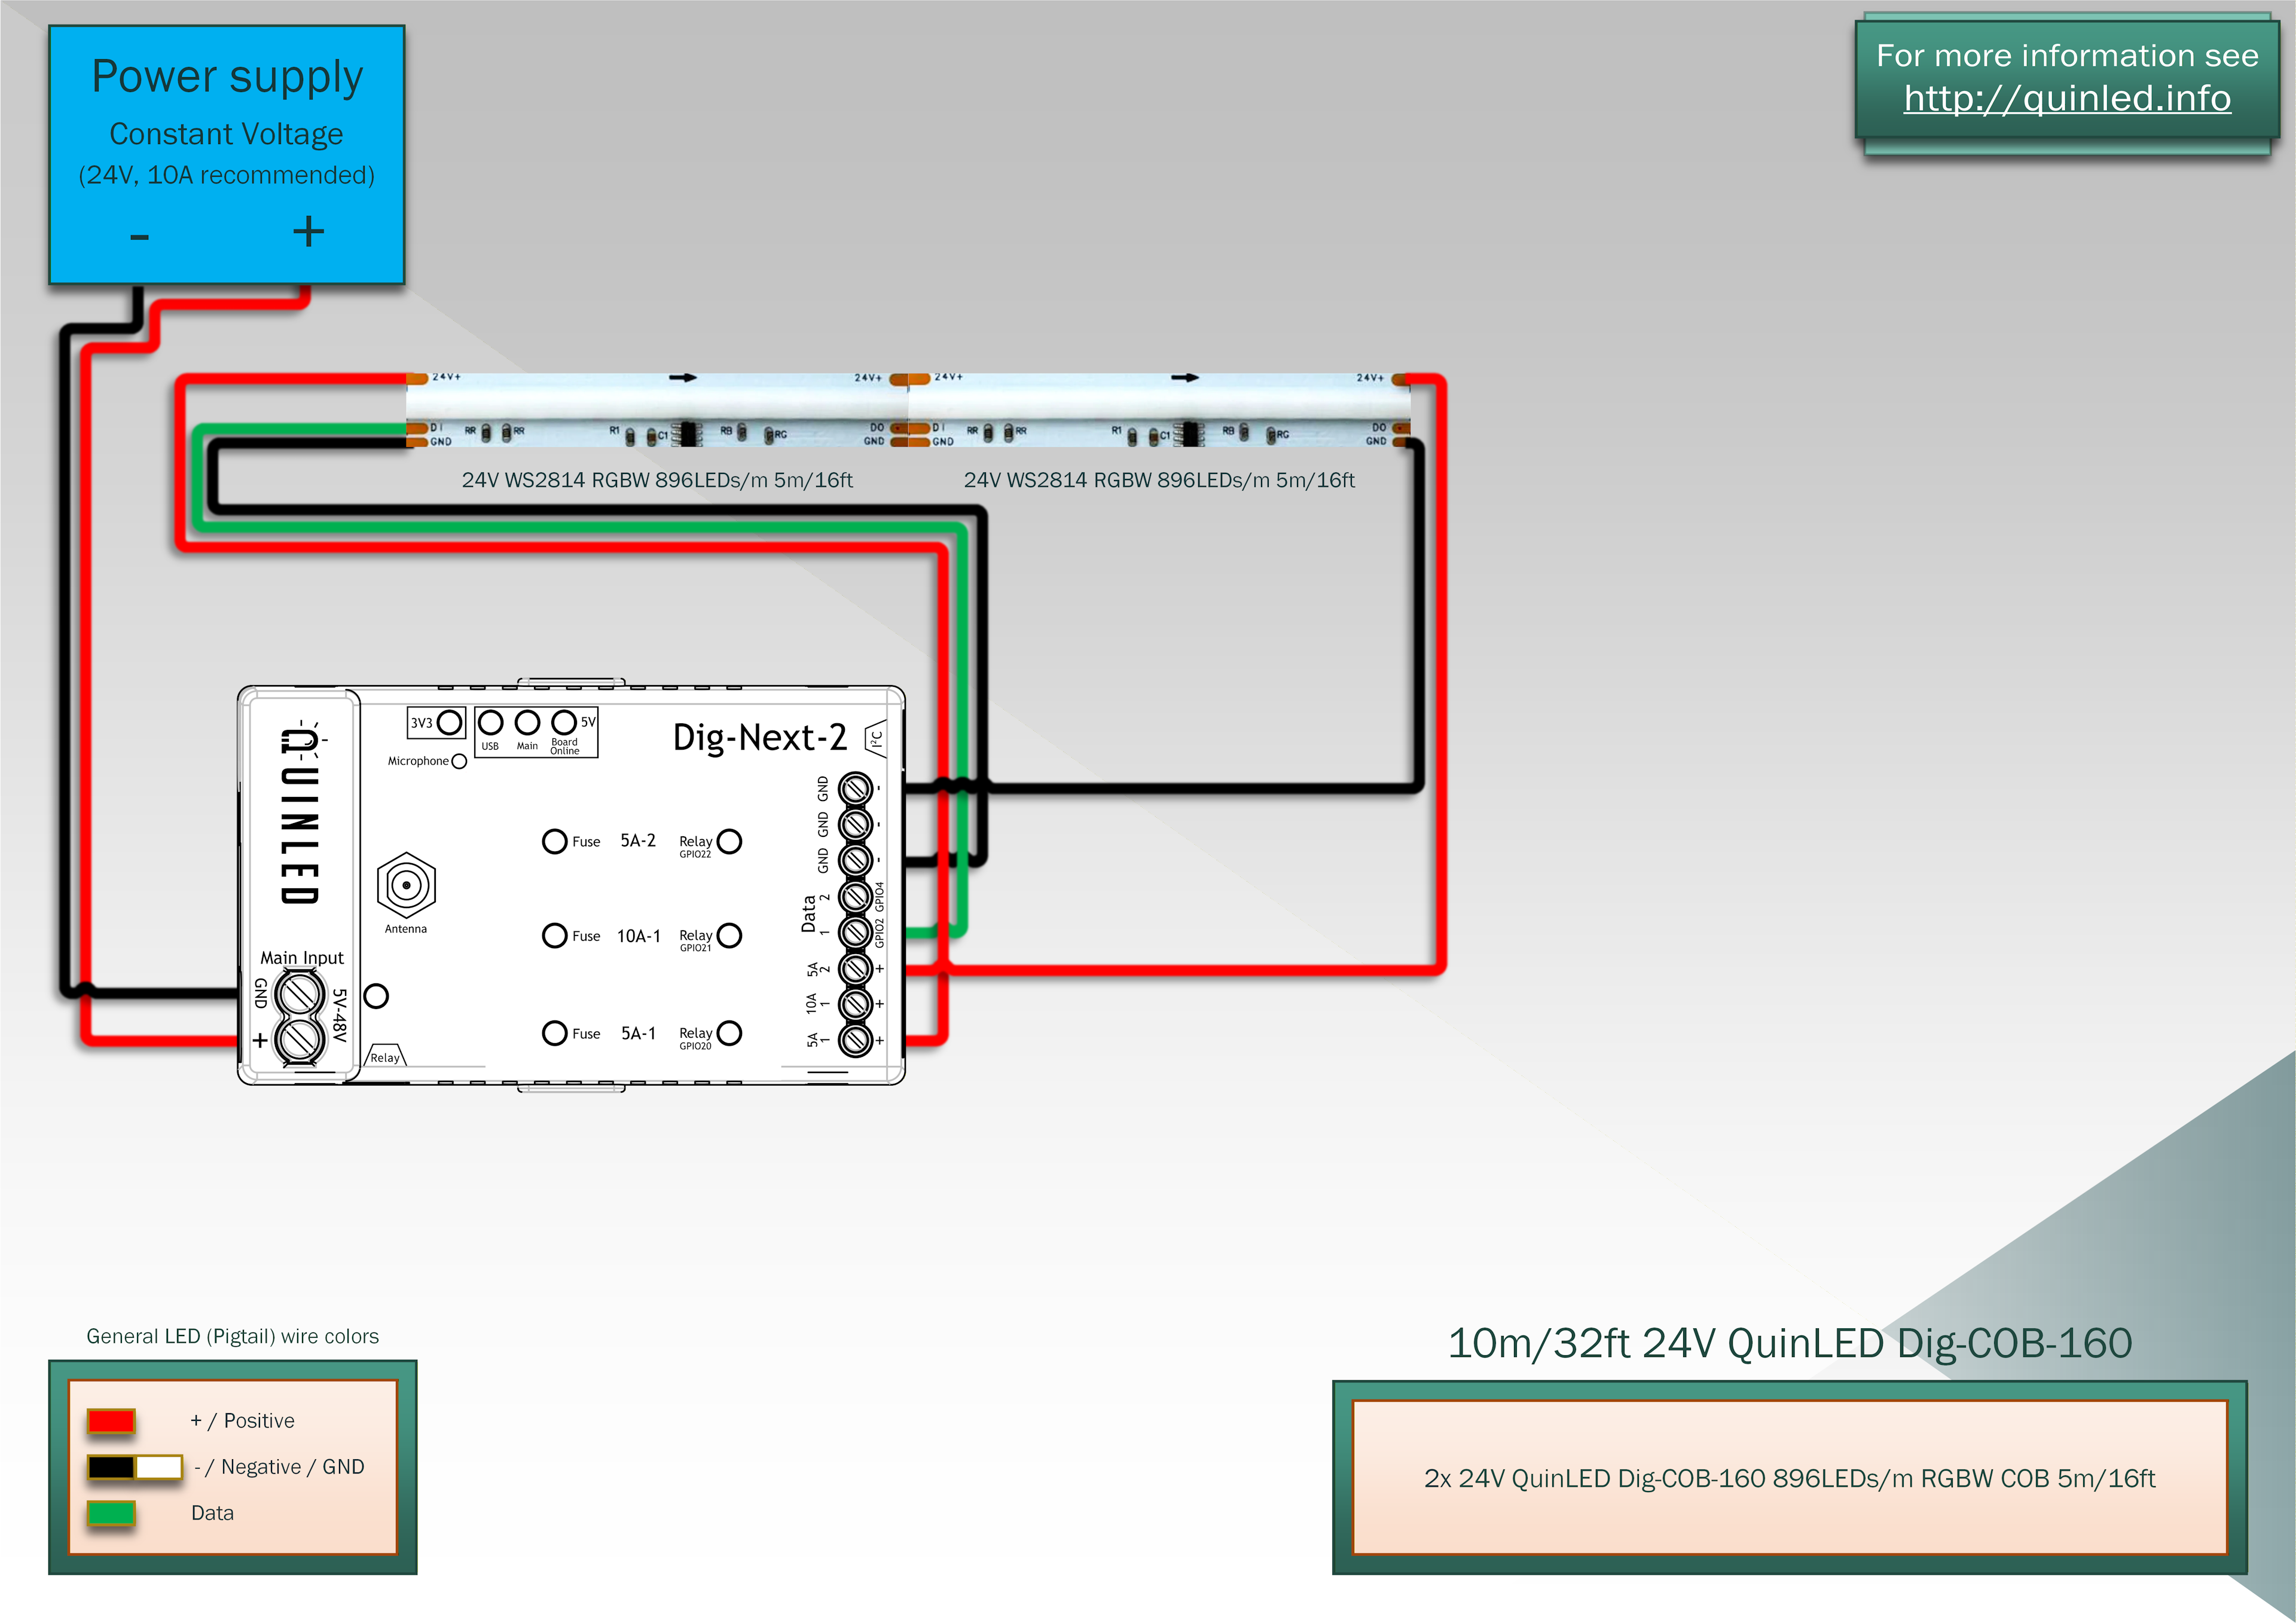 10m/32ft example, 2 injections are already required, these strips get bright!
 20m/64ft example, triple injections is basically a must and a second data output too to keep a good framerate!
Because of the current and zones (each strip has 160 RGBW zones, 4 strips is 640 zones which will drop you to about 30FPS on a single data connection, 2 data connection as shown above highly recommended!) you need quite a bit of wiring to get it working so that you can use the available brightness and zones! These can certainly light up your room though. 😉
No example diagram for the 12V SK6812-CC because they basically follow the same rules as the 2 above examples.
End conclusion
It’s impossible to perfectly describe each scenario but the above should cover a lot of common scenarios people are trying to build I believe. If your exact scenario isn’t there you can often take one that is close to it or calculate it yourself using the ultimate wiring guide! If you are looking at doing something a bit more complex, come join us on the Discord server and we’ll try to help you figure it out!