
How to dim an LED!
Why is PWM used to dim and LED and what does it actually do? Let’s find out in this article! It will help you understand better why some things are as they are and we need good quality PWM dimmers to control our LED lighting.
A bit of history
Incandescent lights
Before we used LEDs for lighting we had incandescent bulbs, basically filament which glowed by heating it up. In those days we already had dimmers and since most lighting was ran from Alternating Current (AC), the dimmers also worked on the AC side.
Depending where you live in the world our AC grid basically oscillates in a sine wave at 50Hz or 60Hz, this creates our well known AC waveform.

Looking at this waveform you see that it crosses through the middle many times during a second (50 or 60 times) which means that at that moment in time there is no current flowing to the light. You would think this would create an issue but for our old type of lighting, the glowing heated up filament this actually wasn’t the case. Because the filament was slow to respond to changes, the pulsing nature of the AC (Alternating current) wasn’t actually as much of a problem as you’d think. Yes, 50 or 60 times a second the filament would receive no current and thus start to cool down, the average available current meant this wasn’t actually very visible and the filament just kept burning and thus glowing.
Dimming Incandescent lights
Dimming an Incandescent light is generally done using “triac dimmers” these manipulate the AC waveform and basically either cut it off to create a lower amplitude that the filament sees and thus it glows less bright. In generally these did not influence the amount of flicker visible. TRIAC dimmers can be had in 2 forms, leading-edge or trailing edge and it determines where the waveform is cut.

Fluorescent lights
In search of greater efficiency we move past the glowing Filament bulbs and for general house holds we moved to the fluorescent lights. These work on a very different principle! They have a type of gas inside that can be “excited” to produce light. With an dimmable electronic ballast these fluorescent type lights can be dimmed and controlled. These ballasts could control the amount of light produced by varying the impulses sent into this gas and depending on the frequency this was done and the amplitude (more about this later) these lights could be dimmed. But, because it was still tied to the AC waveform they would often flicker quite heavily.
Introduction of “flickering lights”
The reason for this was because the gas didn’t have the same properties as the filament style lights. The filament would remain glowing through the AC lifecycle but the excited gas was able to respond much faster to the fluctuating currents and thus this 50Hz or 60Hz flicker would visible in a lot of fluorescent style lights this flicker would be generally be at twice the frequency of the AC circuit so 100Hz or 120Hz. Although generally considered “fine for humans” there is a lot of controversy around that and I personally tend to agree with that this frequency is much too low and can be visible especially to people sensitive to it.
Later on with better quality Electronic ballasts the amount of this flickering was minimized or reduced to much higher frequencies making this problem partially go away while still being coupled to the AC waveform.
Introduction of “Low Quality White”
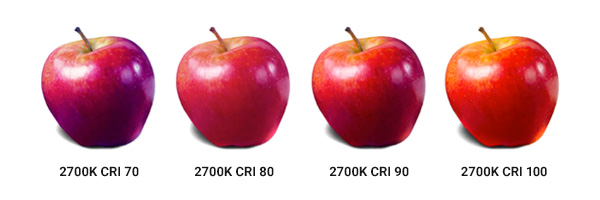
Fluorescent lights also showed a new problem, they would not produce the same spectrum of light we where used to. The principles of the light before that, the incandescent filament lamp basically mimicked the properties of the sun and thus also gave off the same spectrum of light. But these new Fluorescent lights used a very different principle and depending on the phosphors used they would have a very narrow band of spectrum instead of the whole spectrum. This meant cheaper lights had a very limited spectrum and thus didn’t produce “high quality white” light or had a low CRI and higher quality lights had a multi-phospher coating allowing them to produce a broader and better spectrum producing a decent to good CRI.
CRI is a big big thing for white lighting to actually illuminate everything you see under that light with the correct spectrum so that it looks natural to your eyes when you see it.
What’s CRI? CRI stands for Color Rendering Index and it basically classifies how well the light source is able to reproduce the normally expected spectrum of white light. Please find more information about this in my article here.
Light Emitting Diode (LED) style lights
Moving forward in history we arrive at our current form of lighting and that’s LED based lighting. LED lighting is based on a semiconductor device that emits light when current flows through it. That’s about as technical as we are going to about that since it’s not really important for this article.
The reason the whole world has moved to this form of lighting is because it was again multitudes more efficiency then anything that came before it. And using less energy to produce the same amount of or more luminous flux or light, is a good thing!
LEDs moved through several generation to where we are now. Early LED lighting had bad quality CRI (just like fluorescent lighting) but this has improved immensely over the years to where we can now make “perfect” CRI99 White LEDs. As has the efficiency of LED lighting!
Flickering still an issue!
But wait, this whole article was to talk about PWM and how and why it’s used to dim LED lights! Now you’re telling me flickering of the lights is still an issue? Yes but in this case it isn’t an unintentional side effect but something done on purpose!
LEDs are DC and Constant Current
LED lights are inherently Direct Current (DC) based so they don’t suffer from any AC flickering since they have a constant waveform instead of a sinewave. So LED lights will not flicker because of anything AC related!
LED lights are also inherently Constant Current devices instead of Constant Voltage. In short this means that an LED diode doesn’t expect for instance “12v” but it instead it wants “100mA” of current at whatever voltage. This isn’t really the article to dive into that, I have an article here (FUTURE!) where I dive deeper into the intricacies of Constant Current vs Constant Voltage LED lighting. For now it suffices that inherently an LED is a constant current device but that it can easily be made to function on Constant Voltage too with just a current limiting resistor (or more advanced methods).
Dimming with changing voltage has side-effects
So then how do we dim an LED? Well because of how LEDs function, dimming by lowering the voltage actually influences the light the LED diode produces. So if a LED diode wants “100mA” at 18v. Giving it only 12v or 8v will effectively dim the LED. Generally this is done in systems which also have current limiting resistors (Like most generic LED strip we are used to) it will also start drawing less current. However as mentioned this also influences the light the LED produces, changing the spectrum but worse also the color of the light! Generally this is deemed as not acceptable.
LEDs are Instant on and off
One of the properties of an LED diode is that it’s basically instant on and off. There are no after glow effects like with Incandescent bulbs for instance.
PWM LED Dimming
And here we finally get to PWM Dimming. PWM dimming is basically turning on and off the LED really quickly. If your dimmer allows for it this can be done thousands if not tens of thousands of times a second. By doing this fast enough we again create an average light level for our eyes and effectively the LED will appear to be dimmed.
This intentional flickering removes the issue of having a lower voltage on the LED. Each pulse will light the LED with the correct amount of current and voltage so it will always perform ideally. But then how do we determine how bright the light should be?
This is done by varying how long each of those pulses takes.
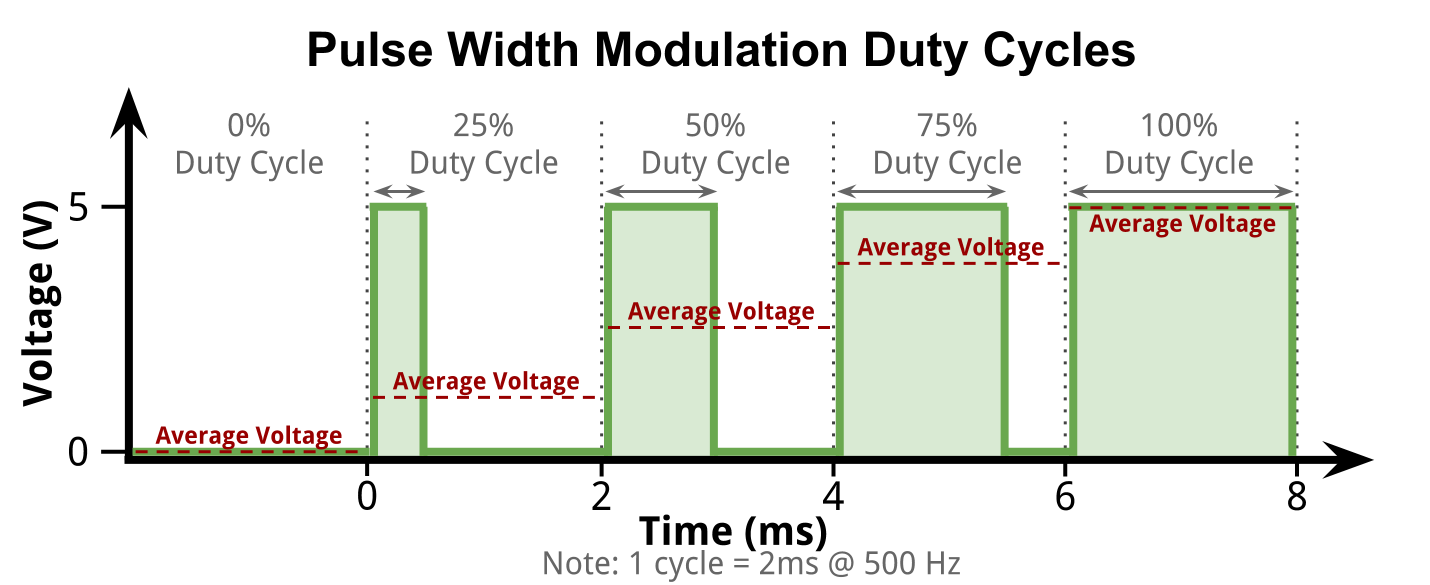
As you can see in the above picture, by changing the width of the pulses (not the amount of pulses per second) we can change the average brightness perceived!
There is still flicker
So using LEDs hasn’t inherently solved the flickering light issue that was introduced with earlier technologies. It is however fully decoupled from our AC grid pulses because it’s running with DC. The flicker we use to dim the lights can be very tightly controlled and with high enough frequenties shouldn’t cause any visible flicker, even for the most sensitive people or for instance video cameras. This can introduce other issues such as EMI/EMC interference but those can generally also be somewhat mitigated.
High Frequency PWM LED dimming as solution
A big part of the reason I developed the QuinLED-An series is because I wanted high power and high frequency PWM dimming. 100Hz to 120Hz that a lot of commercial offerings use is way too low in my opinion, personally I feel you want at least 1kHz and preferably, depending on the application as high as ~20kHz to ~40kHz! This way all lights can be used for filming or other critical applications.
Next to that I also use Analog LED or PWM dimmed LEDs when I need a good resolution such as changing color backgrounds, etc.
Further Analog LED strips can be had with much much more power and thus light then their digital counterparts. The same goes for high quality white light, which I find important even in my living environment, cannot be had with digitally addressed strips.
So depending on the application you either want analog or PWM controlled LED strips or digitally addressable LED strips.
Potential downside
A potential downside to high frequency PWM LED dimming is that if the cables and LED strips become very long this means the whole LED strip is turning on and off at very high frequency and can start to resemble an antenna so it will start to send a lot of EMI (Electro Magnetic Interference) out into the world. At the frequencies we’re talking about this generally isn’t an issue but it’s still advisable to try and keep the wires from the LED PWM dimmer to the LED strip as short as possible.
QuinLED-An PWM dimmers
A lot of the above story is what led me to develop the QuinLED-An PWM dimmers. A lot of available solutions in the market lack (one) of the following:
- High frequency PWM
- To see no flickering a lot of commercial offerings still PWM at 100Hz to 120Hz which is way too low. Newer dimmers do now often offer 1kHz to 2kHz but for video purposes this can still be very low.
- High Power handling
- Many dimers out there mention high currents but this is often not while actually dimming LEDs, depending on the frequency (which is often still low) they can overheat
- Configuration Flexibility
- If you have a 5 channel dimmer I would like to determine if I use it as RGB+CCT or maybe 5 independent white channels, etc.
- Good Connectivity
- Most commercial dimmers use low quality integrated WiFi and offer no options such as external Antennas or Ethernet
- The new QuinLED-An pre-assembled versions do!
- I personally do not use Zigbee or Zwave so would like my dimmer to connect to my WiFi network
- Most commercial dimmers use low quality integrated WiFi and offer no options such as external Antennas or Ethernet
- Real local control
- Most dimmers come with completely locked down software, if you are lucky there is an app that can change some stuff but most often not
- I want to talk over my local network to my devices, not have to go through my internet line to tell some part of the cloud to do something locally in my home
- On top of that I want basically native integration with my Home Automation software of choice which in my case is Home Assistant
- Expandability (buttons, I2C, etc.)
- Sometimes I want to connect a button or for instance a temperature and humidity sensor to where my dimmer is located
My boards, especially the newest pre-assembled versions integrate all of these features allowing you to build your lighting like you want it, natively controlled from Home Assistant!