
Dig-Uno/Quad Microphone guide
If you want to hook up a microphone to a QuinLED-Dig-Uno or QuinLED-Dig-Quad to make use of audio reactive effects there are a few different options you have. This guide will show you the options including how to wire them up and get them working in WLED.
This guide assumes you are using WLED v14-b1/b2 with the audio reactive USERMOD compiled in (It is NOT by default!), you can find pre-compiled versions on https://install.quinled.info.
Easy plug & play options
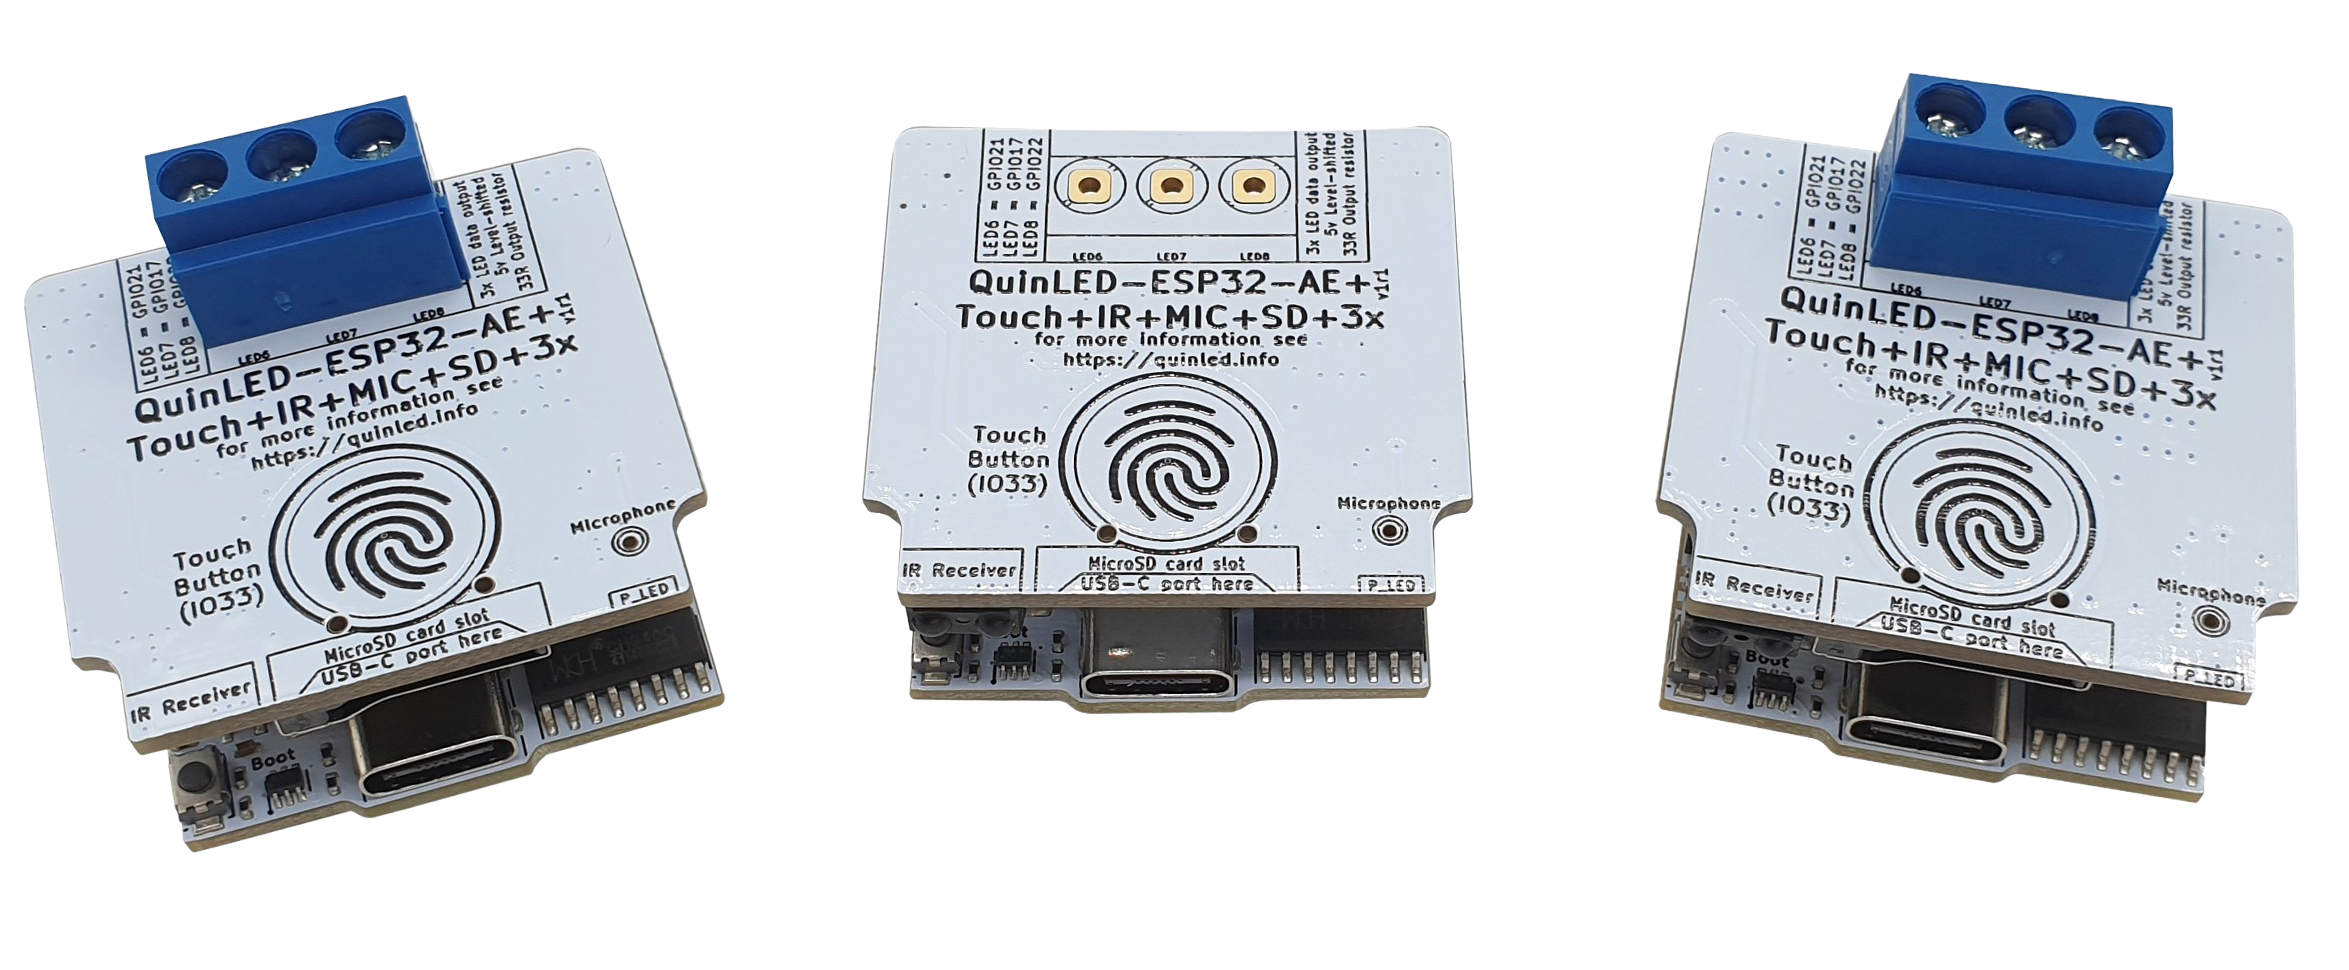
QuinLED-ESP32-AE+ board
The easy plug & play method is to use a QuinLED-ESP32-AE+ version on your Dig-Uno or Dig-Quad, this has a special top board with multiple functions of which one of them is adding a high-quality digital microphone. You replace the ESP32 board on there currently with this one, setup the pins (or flash the pre-configured version), enable the USERMOD and done! No wires or anything like that.
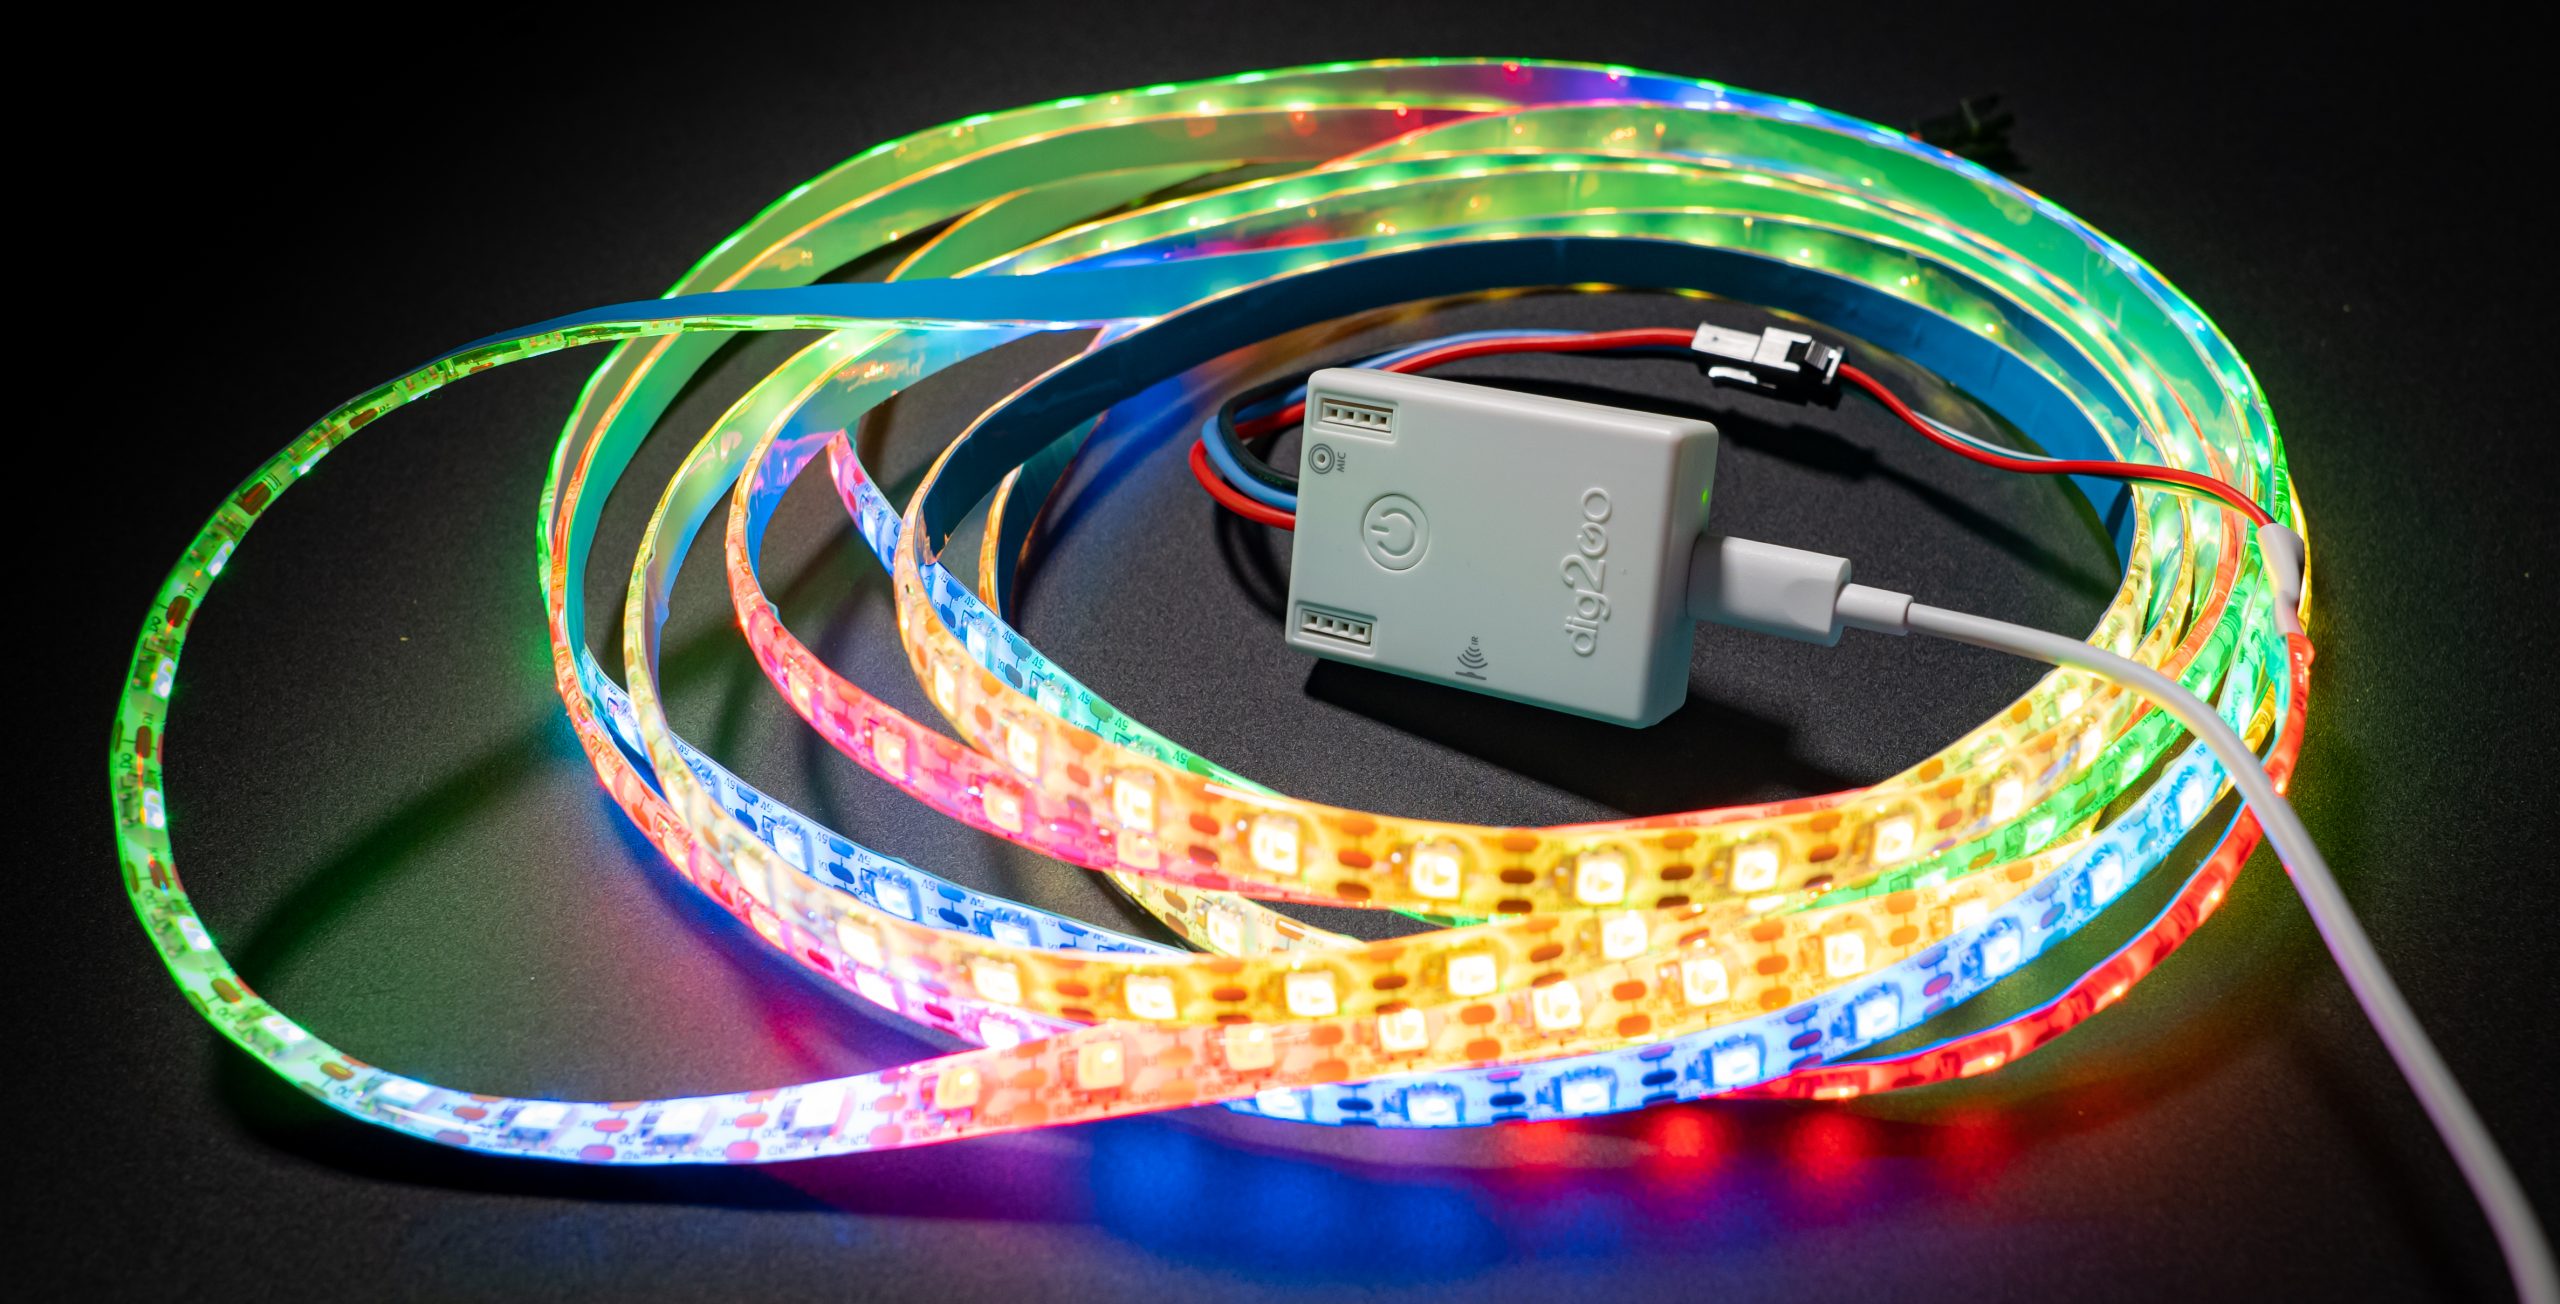
QuinLED dig2go
The dig2go comes equipped with a high quality digital microphone right out of the box. You enable the pre-configured USERMOD, reboot and done, all audio reactive effects work perfectly. You can even have the dig2go pick up the audio and then generate the effects and send those wirelessly over the network to another board which will then show the effect on it’s connected LED strip, but that is a bit more advanced setup.
If you are running the most recent v14-b1 firmware installed through https://install.quinled.info enabling audio reactive is as easy as going to settings -> usermods and enabling “audio reactive”. No need to configure anything (it’s pre-configured), hit save and reboot the module and done, audio reactive works!
Wire it in yourself
Both the Dig-Uno and Dig-Quad have been designed with expandability in mind, including analog or digital microphones. You can purchase generic versions on Amazon or Aliexpress and connect these yourself with a set of dupont wires. This can however sometimes also involve a bit of solder on the microphone module side, be prepared for that!
Analog microphone
An analog microphone is simple (just 3 wires) but also the worst quality. It’ll do for generic responsive effects though.
For this it’s recommended to purchase the MAX4466 antenna, if you wish, please use some of my affiliate links:
![]() Amazon
Amazon
To connect this microphone you solder in the female headers and then use 3x female-female dupont wires to connect to 3.3v, GND and A0 on the Dig-Uno/Quad board. The below example is for the Dig-Uno but the same pins are present on the Dig-Quad.
*The inner rows of pins can feel a bit snug with the ESP32 on there but it’s partly designed like this so the dupont wires won’t fall out too easily!

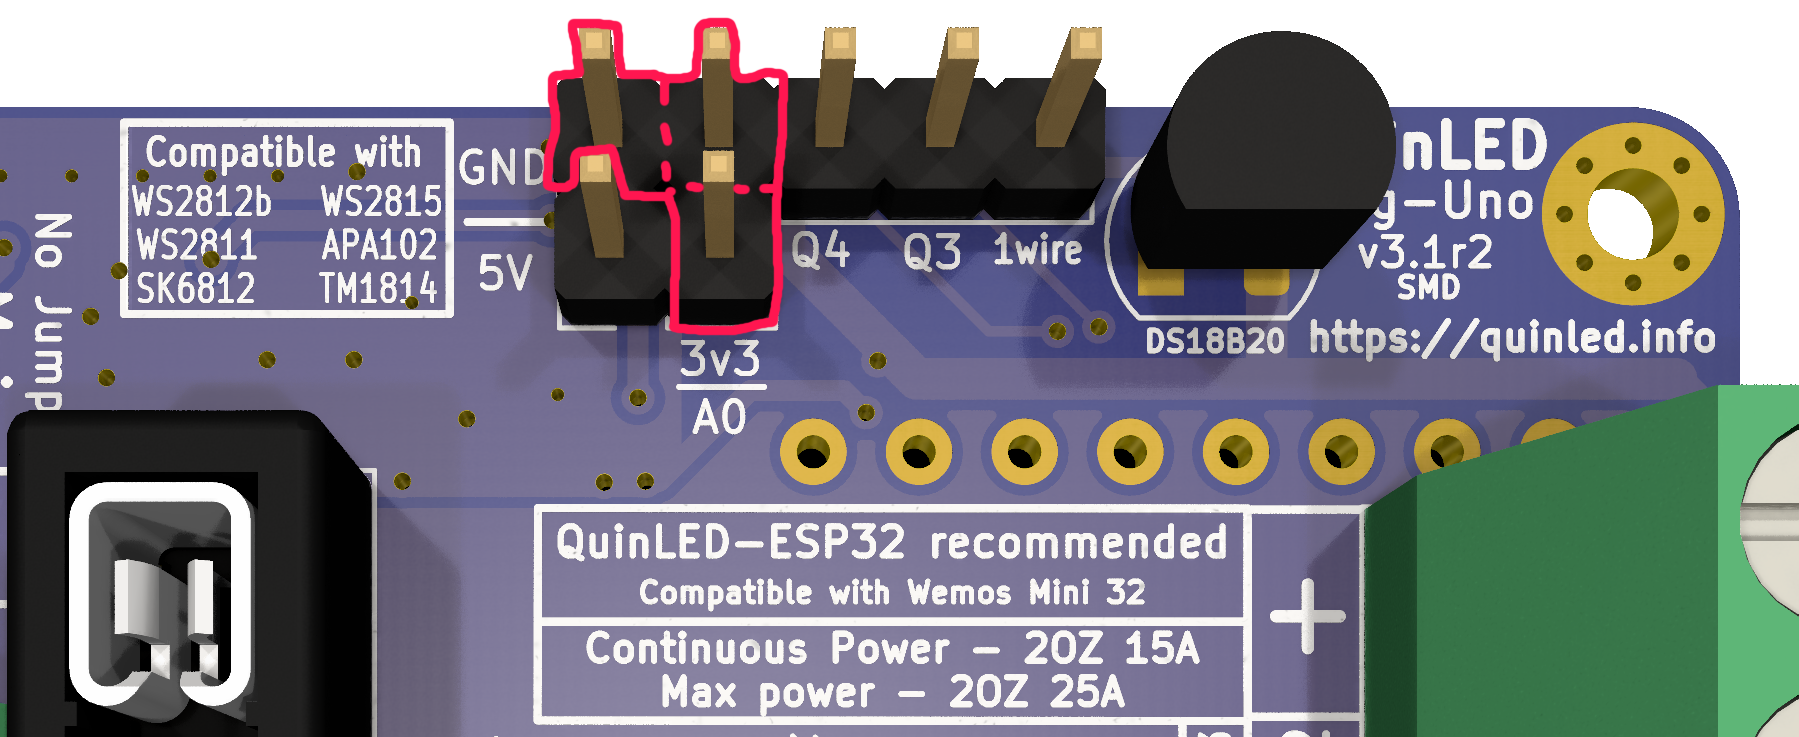
Next in WLED you configure the microphone is the Analog type and present on GPIO36.
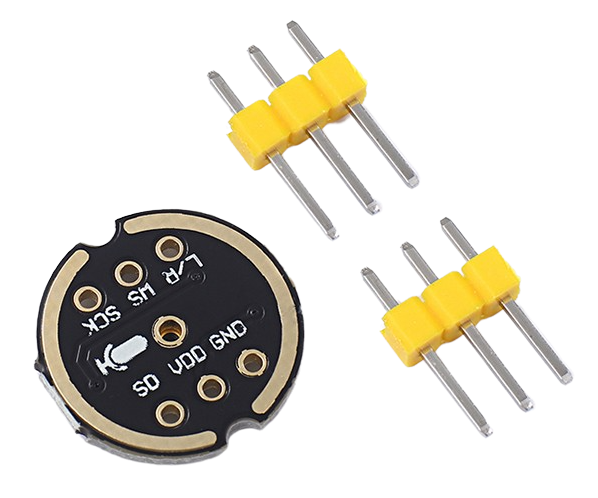
Digital Microphone
If you wish higher quality audio reactive effects a digital microphone is much better this is also the reason why I’ve integrated a high quality version on the QuinLED-ESP32-AE+ and dig2go! You can however wire this in yourself too, there are relatively cheap modules available and with a bit of soldering and dupont wires you can easily connect one of these to your Dig-Uno or Dig-Quad.
I recommend getting a INMP441 microphone, you can use one of my affiliate links here:
![]() Amazon
Amazon
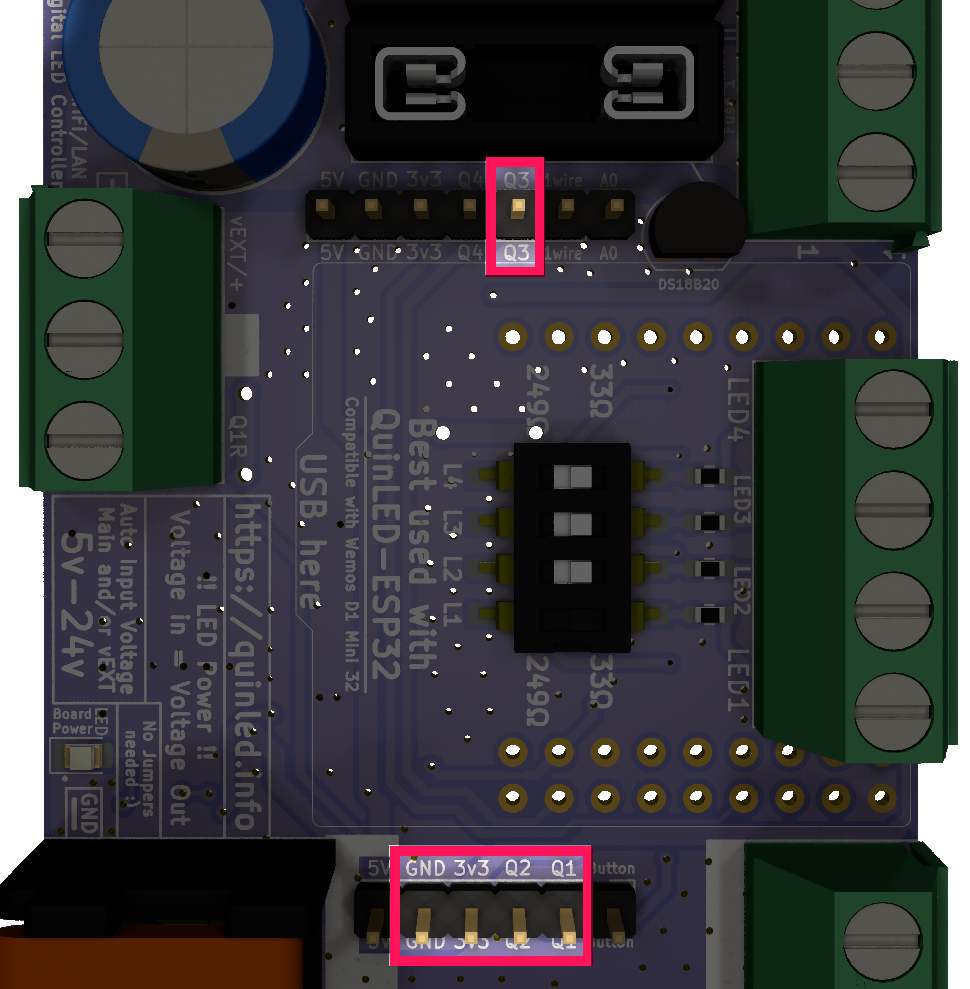
To connect this microphone you solder in the female headers and then use 5x female-female dupont wires. First we have power, connect these to 3.3v and GND. And then we have 3 data pins, SD, WS, SCK. I know most guides on the Internet give you certain pins to use but the one’s on the Dig-Uno/Quad are different. These boards have their Q1-Q4 pins and we can use those to make the connection. The following order is recommended:
- 3v3 to Mic VDD
- GND to Mic GND
- Q3 to Mic SD = GPIO_2
- Q2 to Mic WS = GPIO12
- Q1 to Mic SCK = GPIO15
Solder up the two rows of pin headers to the microphone board and then connect your female-female dupont wires with these connections, set the settings to this, save and reboot the controller and you should be all set!
 In this example I’m showing the connections on the Dig-Quad but the same pins are available on the Dig-Uno:

In reality it will look a little bit something like this (Older Dig-Uno example):
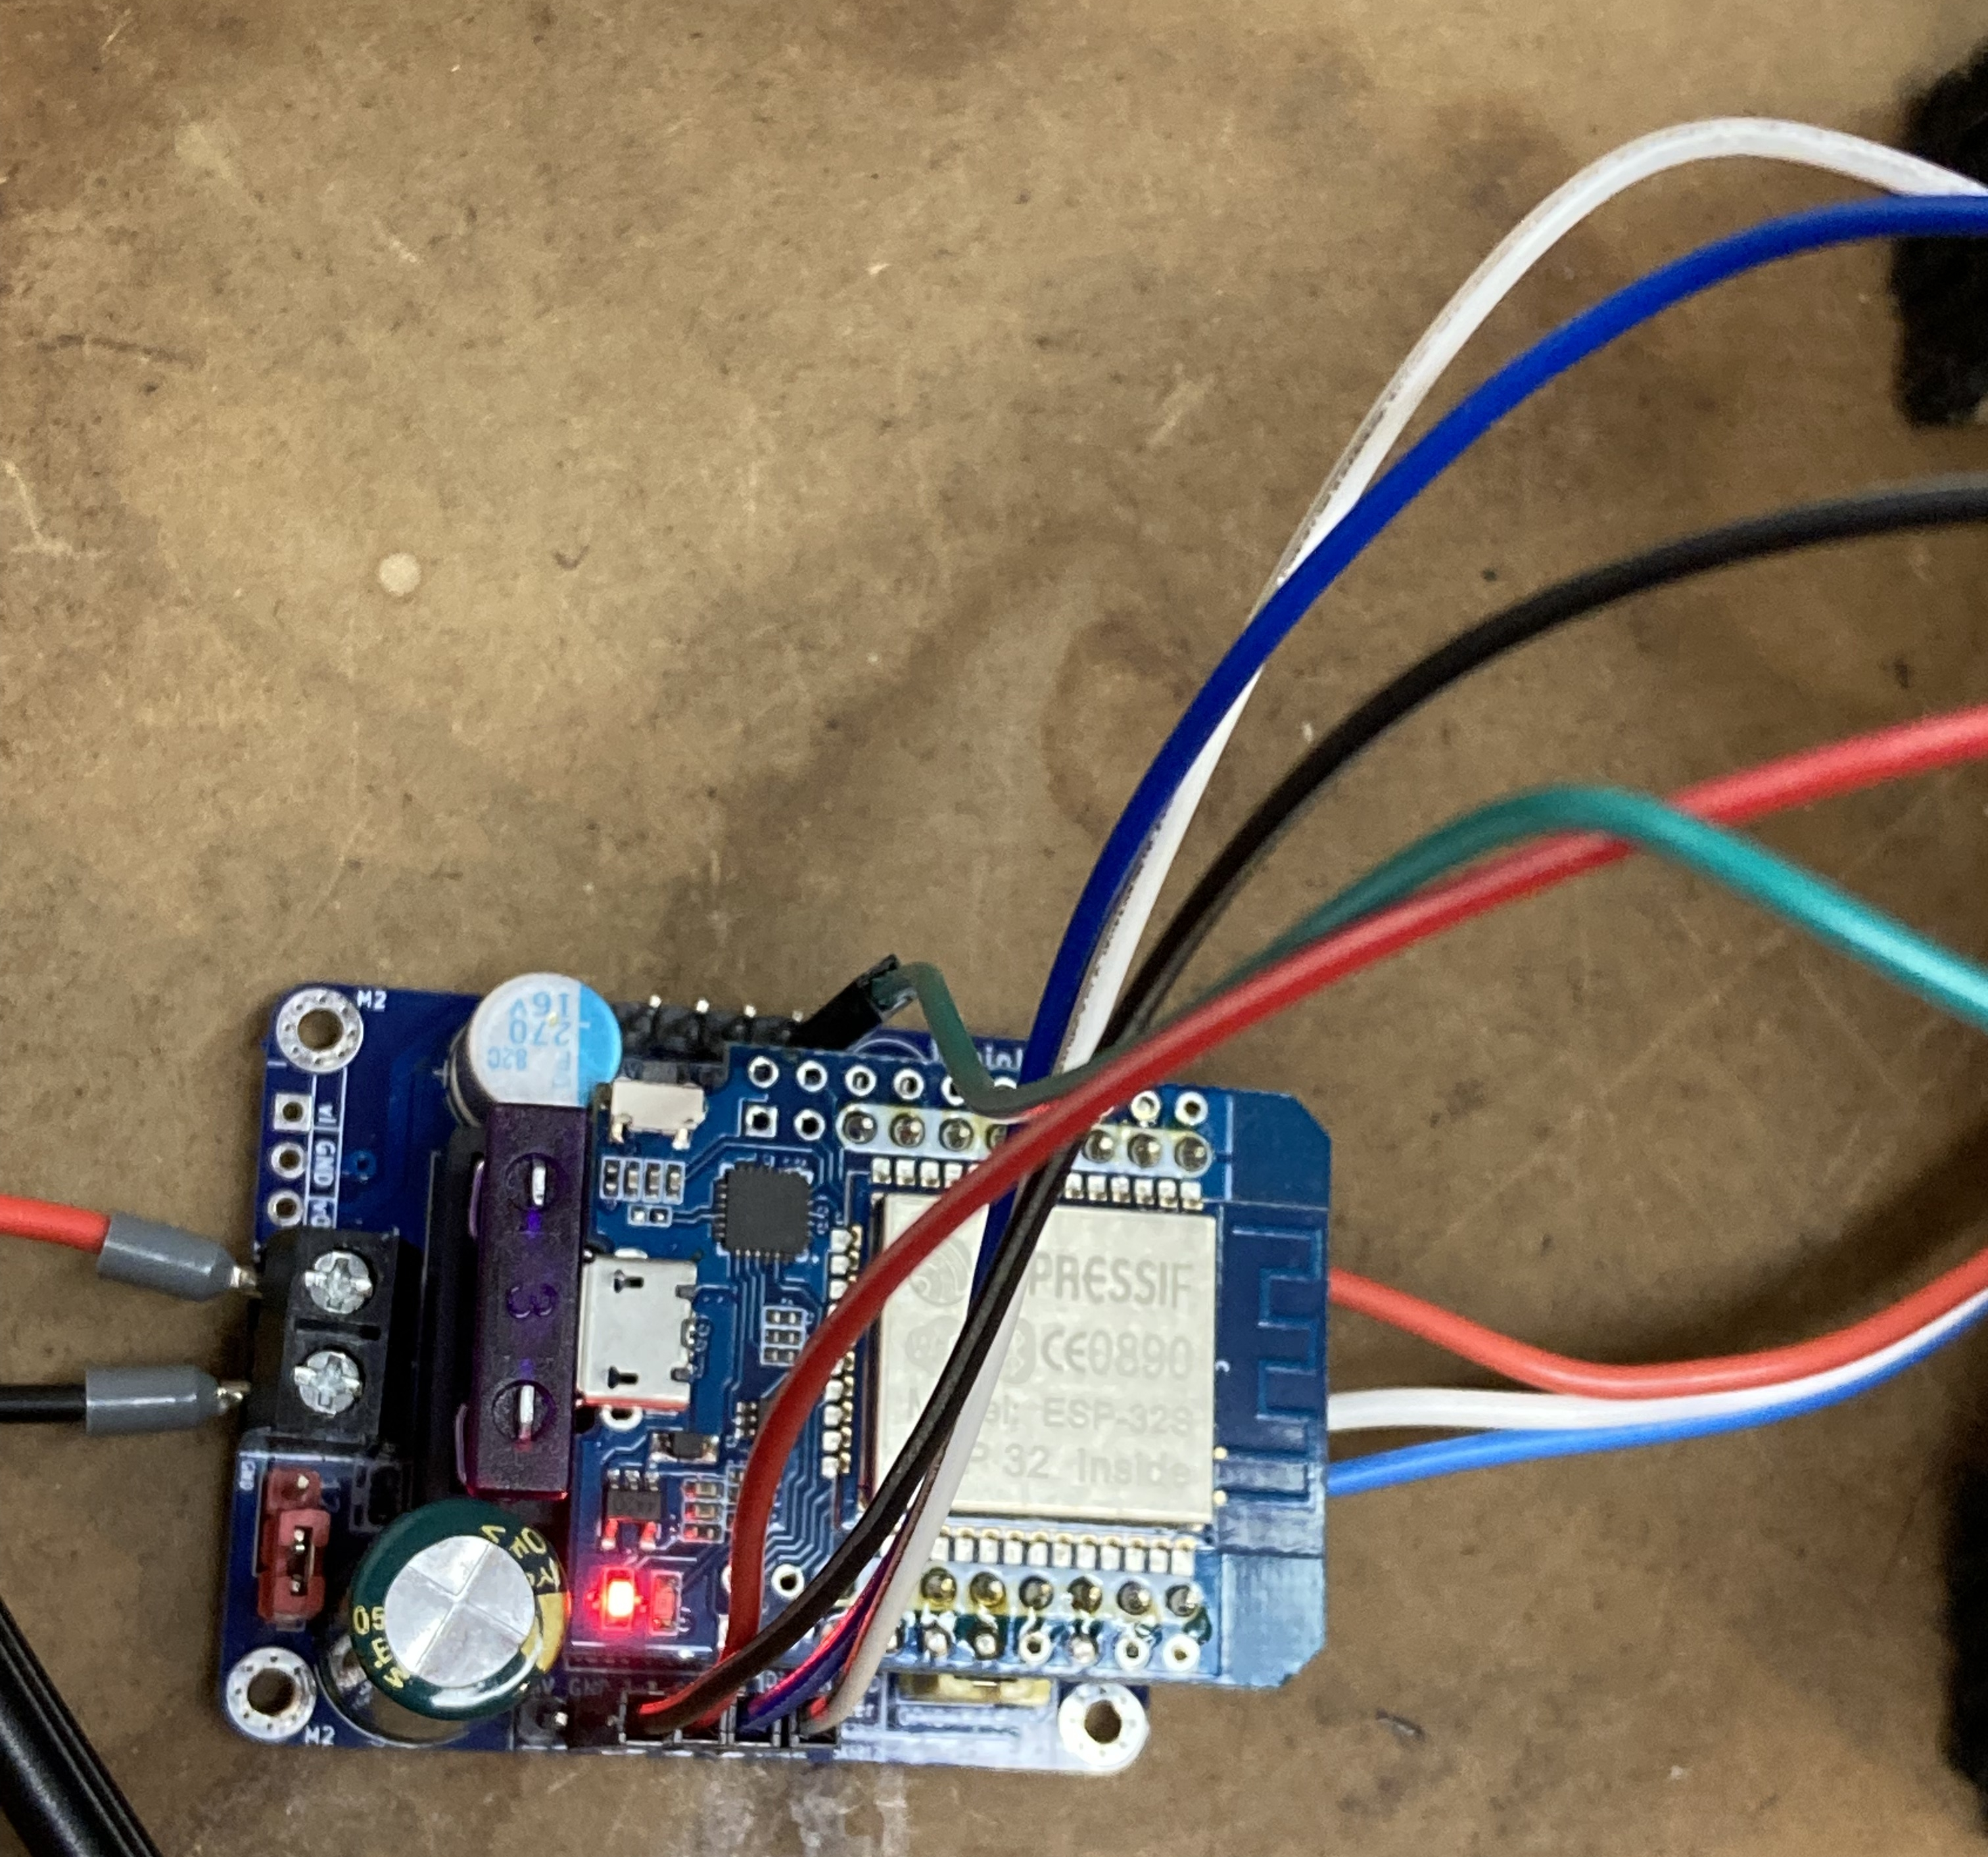


Photos curtesy of wingscastona on the Discord server!
Tuning the Microphone
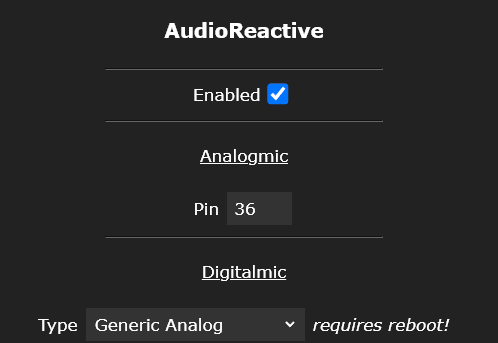
After we’ve configured our microphone and it’s working there are a few settings we can tweak to make it react perfectly to the environment you are currently in. In the USERMOD menu several values can be adjusted:
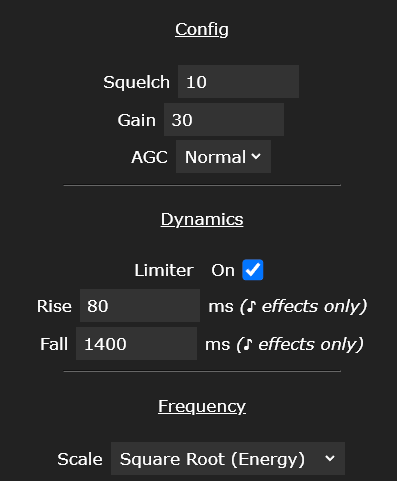
- Squelch: Amount of dampening on the sound, sort of noise filter
- Gain: Adjusts how loud it starts to pick up sounds
- AGC: Automatic Gain Control (automatically varies gain for optimum performance)
What about Dig-Octa?
Sadly the Dig-Octa Brainboard uses all available pins on an ESP32 so it’s not possible to add a audio reactive microphone directly to the board. You can alternatively use a dig2go to receive the sound and forward it over the network to it using the DDP option for instance. Or you can use PC software such as LEDfx to generate the effects on there and then push it to the Dig-Octa, with it having Ethernet this works beautifully!
Conclusion
It’s quite easy to hook up an analog or digital microphone to your QuinLED-Dig-Uno and QuinLED-Dig-Quad, either using a ready to go option in the AE+ and dig2go or wiring it in yourself!