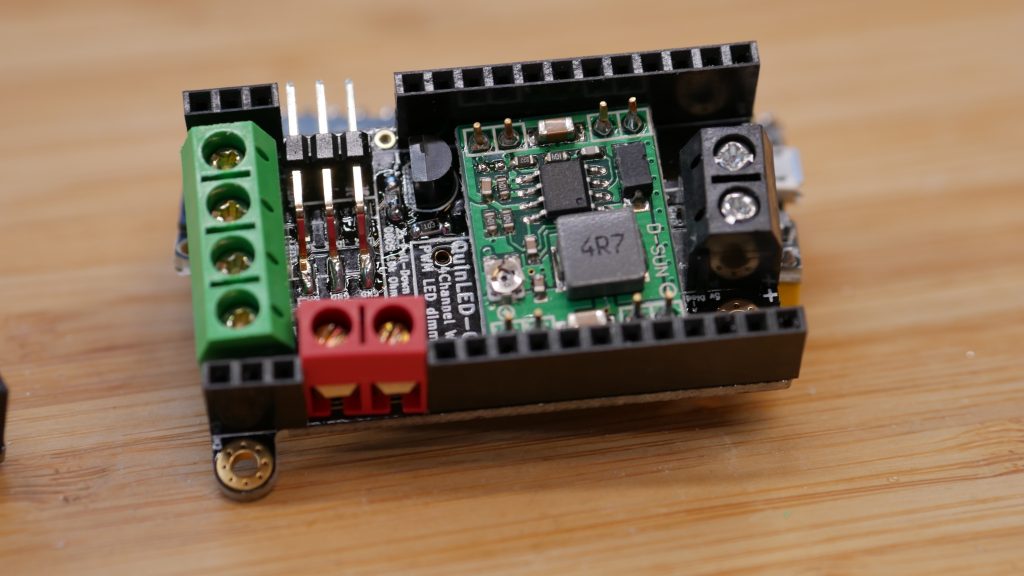
QuinLED-An-Quad
Features
- MH-ET-Live ESP32 development board
- Dual-Core CPU with plenty of memory and hardware timers for PWM generation
- WiFi 2.4Ghz 802.11N connectivity
- Wide software compatibility through Arduino IDE, Micropython or other distributions
- Onboard Micro-USB port and Reboot/EN switches
- 4 channels for PWM LED dimming
- Up to 300.000Hz (tested) PWM dimming frequency on all channels
- Uses TO-252 MOSFETs for hand or surface mount soldering
- 4 independent dimming channels on separate terminals with a shared positive rail on 2 terminals
- Input terminal (easily converted to barrel plug if desired)
- Voltage input and output between ~6.5v to 28v
- *Future testing for higher voltages
- Voltage input and output between ~6.5v to 28v
- Onboard DS18B20 temperature sensor
- 2 GPIO in/outputs available through pin headers
- 1x 5v + 1x 3.3v
- 2x GND pins
- 4x Mounting holes
- 2x M2
- When mounting, use spacers on the bottom for free air around the MOSFETs
- Small size
- Fully assembled the size is about 5cm by 4cm with a height of 2,5cm
- Should fit nicely within in wall electrical box
- Fully assembled the size is about 5cm by 4cm with a height of 2,5cm
- 3D printed enclosure
- Search thingiverse, there are several cases available!
Power handling
Power handling depends on the amount of copper that is applied to the PCB. Generally these values are 1OZ by default or 2OZ if you pay extra. Depending on your needs you need to select the right amount of copper you need in your boards.
This board has a single set of input terminals to provide input power. For output there are 4 minus side terminals and 2 plus side terminals. Dimming happens on the 4 minus/negative channels. Combining a minus and plus side terminal gives you one channel. That way you can create 4 channels total.
Hooking up LED strips
If you are using the channels as 4 independent channels for 4 white LED strips for instance, you will need to put 2 positive connections into each positive terminal. If you are using an RGB(W) strip, you only need one connection in one terminal. Both terminals are connected to the same shared plane, if you cannot get 2 wires into one terminal an external connection block can be used.
You can find common wiring diagrams for the QuinLED-Quad over here.
Maximum input/output voltage
The QuinLED-Quad uses an auto-scaling DC-DC converter for it’s on-board electronics. Currently the on-board voltage converter can officially accept a maximum of 28v. In the future I will be running tests beyond 28v. Since we aren’t using the converter anywhere near the limit it probably can be used up to 36v but more test are required! It requires a minimum of 6.5v to operate correctly.
*If you need to use a higher voltage, take a look at the QuinLED-Deca, it’s suited for up to 50v!
Maximum total power input
| 1 OZ copper | 2 OZ copper | |
| 15 Amps | 25 Amps | |
| 12v | 180w | 300w |
| 24v | 360w | 600w |
Max 1 port power output
| 1 OZ copper | 2 OZ copper | |
| 6 Amps | 8 Amps | |
| 12v | 72w | 96w |
| 24v | 144w | 192w |